B.L.O.O.D.Y. L.E.G.

Meet the BLOODY LEG, the Blood Leaking Obscenely Overengeneered Do-it-Yourself Lower Extremity Graft!

It’s a microcontroller-powered device for simulation maniquin legs. It leaks blood, controlled per bluetooth. The blood does not just flow, it pulsates! You can even set the pulse frequency and volume of blood per pulse. And it shows the battery state of both the remote control and the reciever in the leg. They connect on power-up, and if the two loose connection, the flow shuts down after a moment. Pretty cool, ey?

About ten years ago, I made a simpler version with the innards of a tiny toy RC car and a metronome. Every beep of the metronome would trigger a signal of a certain lenght, which could be set by a potentiometer.

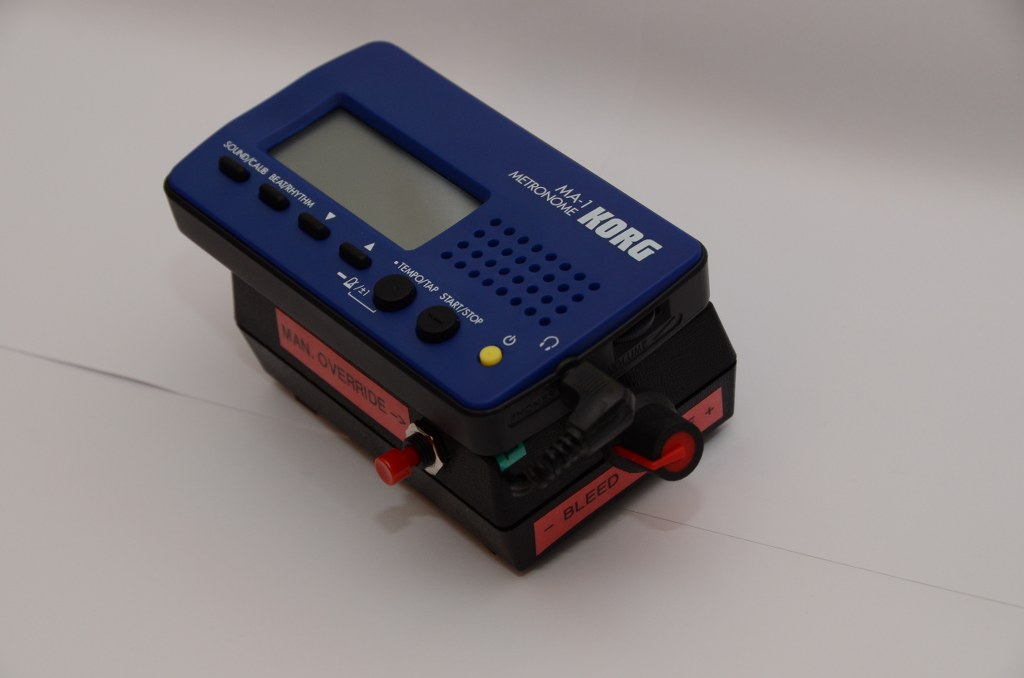
The signal was picked up by the reciever, which opened an solenoid valve from an old dishwasher. One side of the valve was connected to a pressure reservoir made with a syringe and a steel spring.

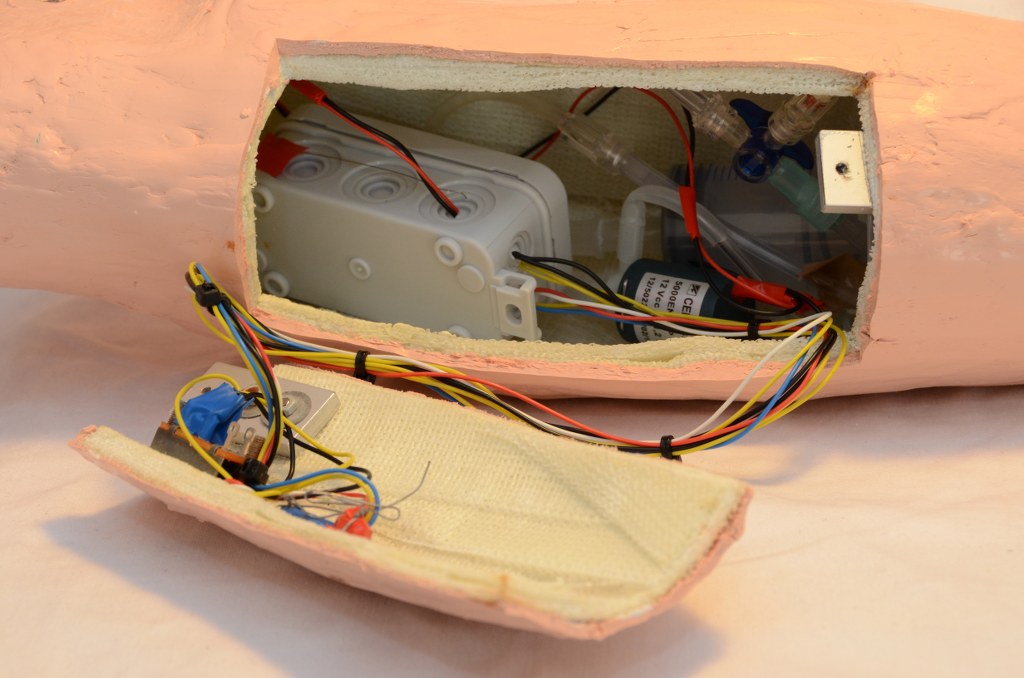
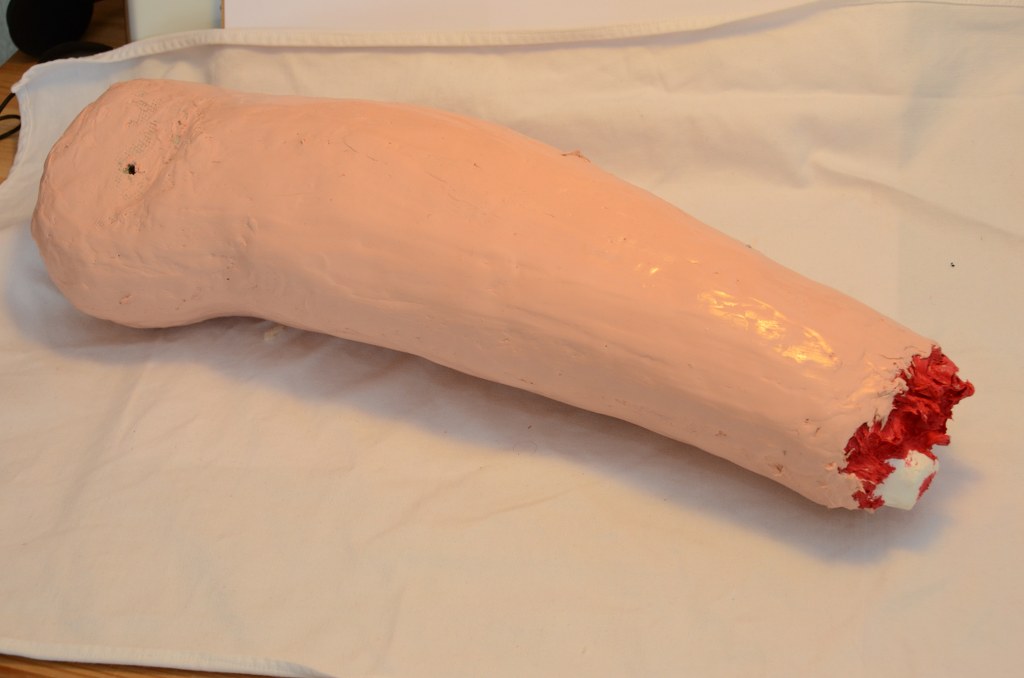
The other side went to the amputated end of the leg, where the foot was missing. Every beep would release a drop or a squirt of blood, depending on the setting of the potentiometer.

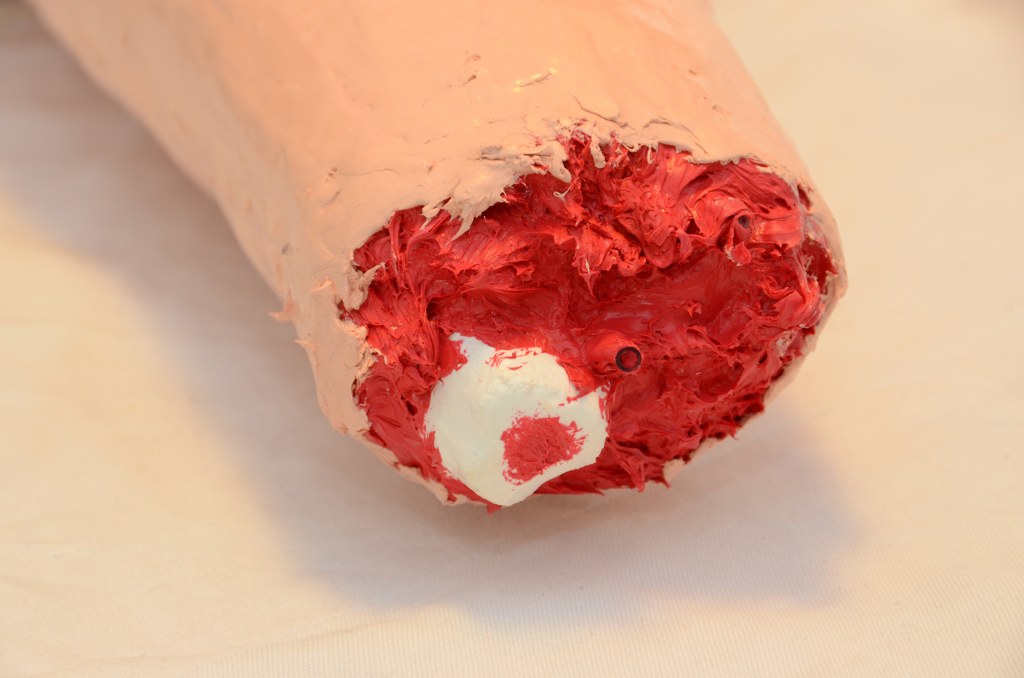
The leg itself is made of fibreglass resin casting tape (3M Scotchcast), coated with colored construction silicone.

But while it worked OK, this system had some drawbacks, too. You had to be really close with the remote control (about 1m), you had to recharge the reciever every 5 minutes, and you never knew when the two 9V batteries powering the solenoid would run out. So I desinged a new system, with a LCD screen and a bluetooth connection. Powered by a microcontroller. Welcome to the digital age!

Take a look at this video on youtube to see how it works.

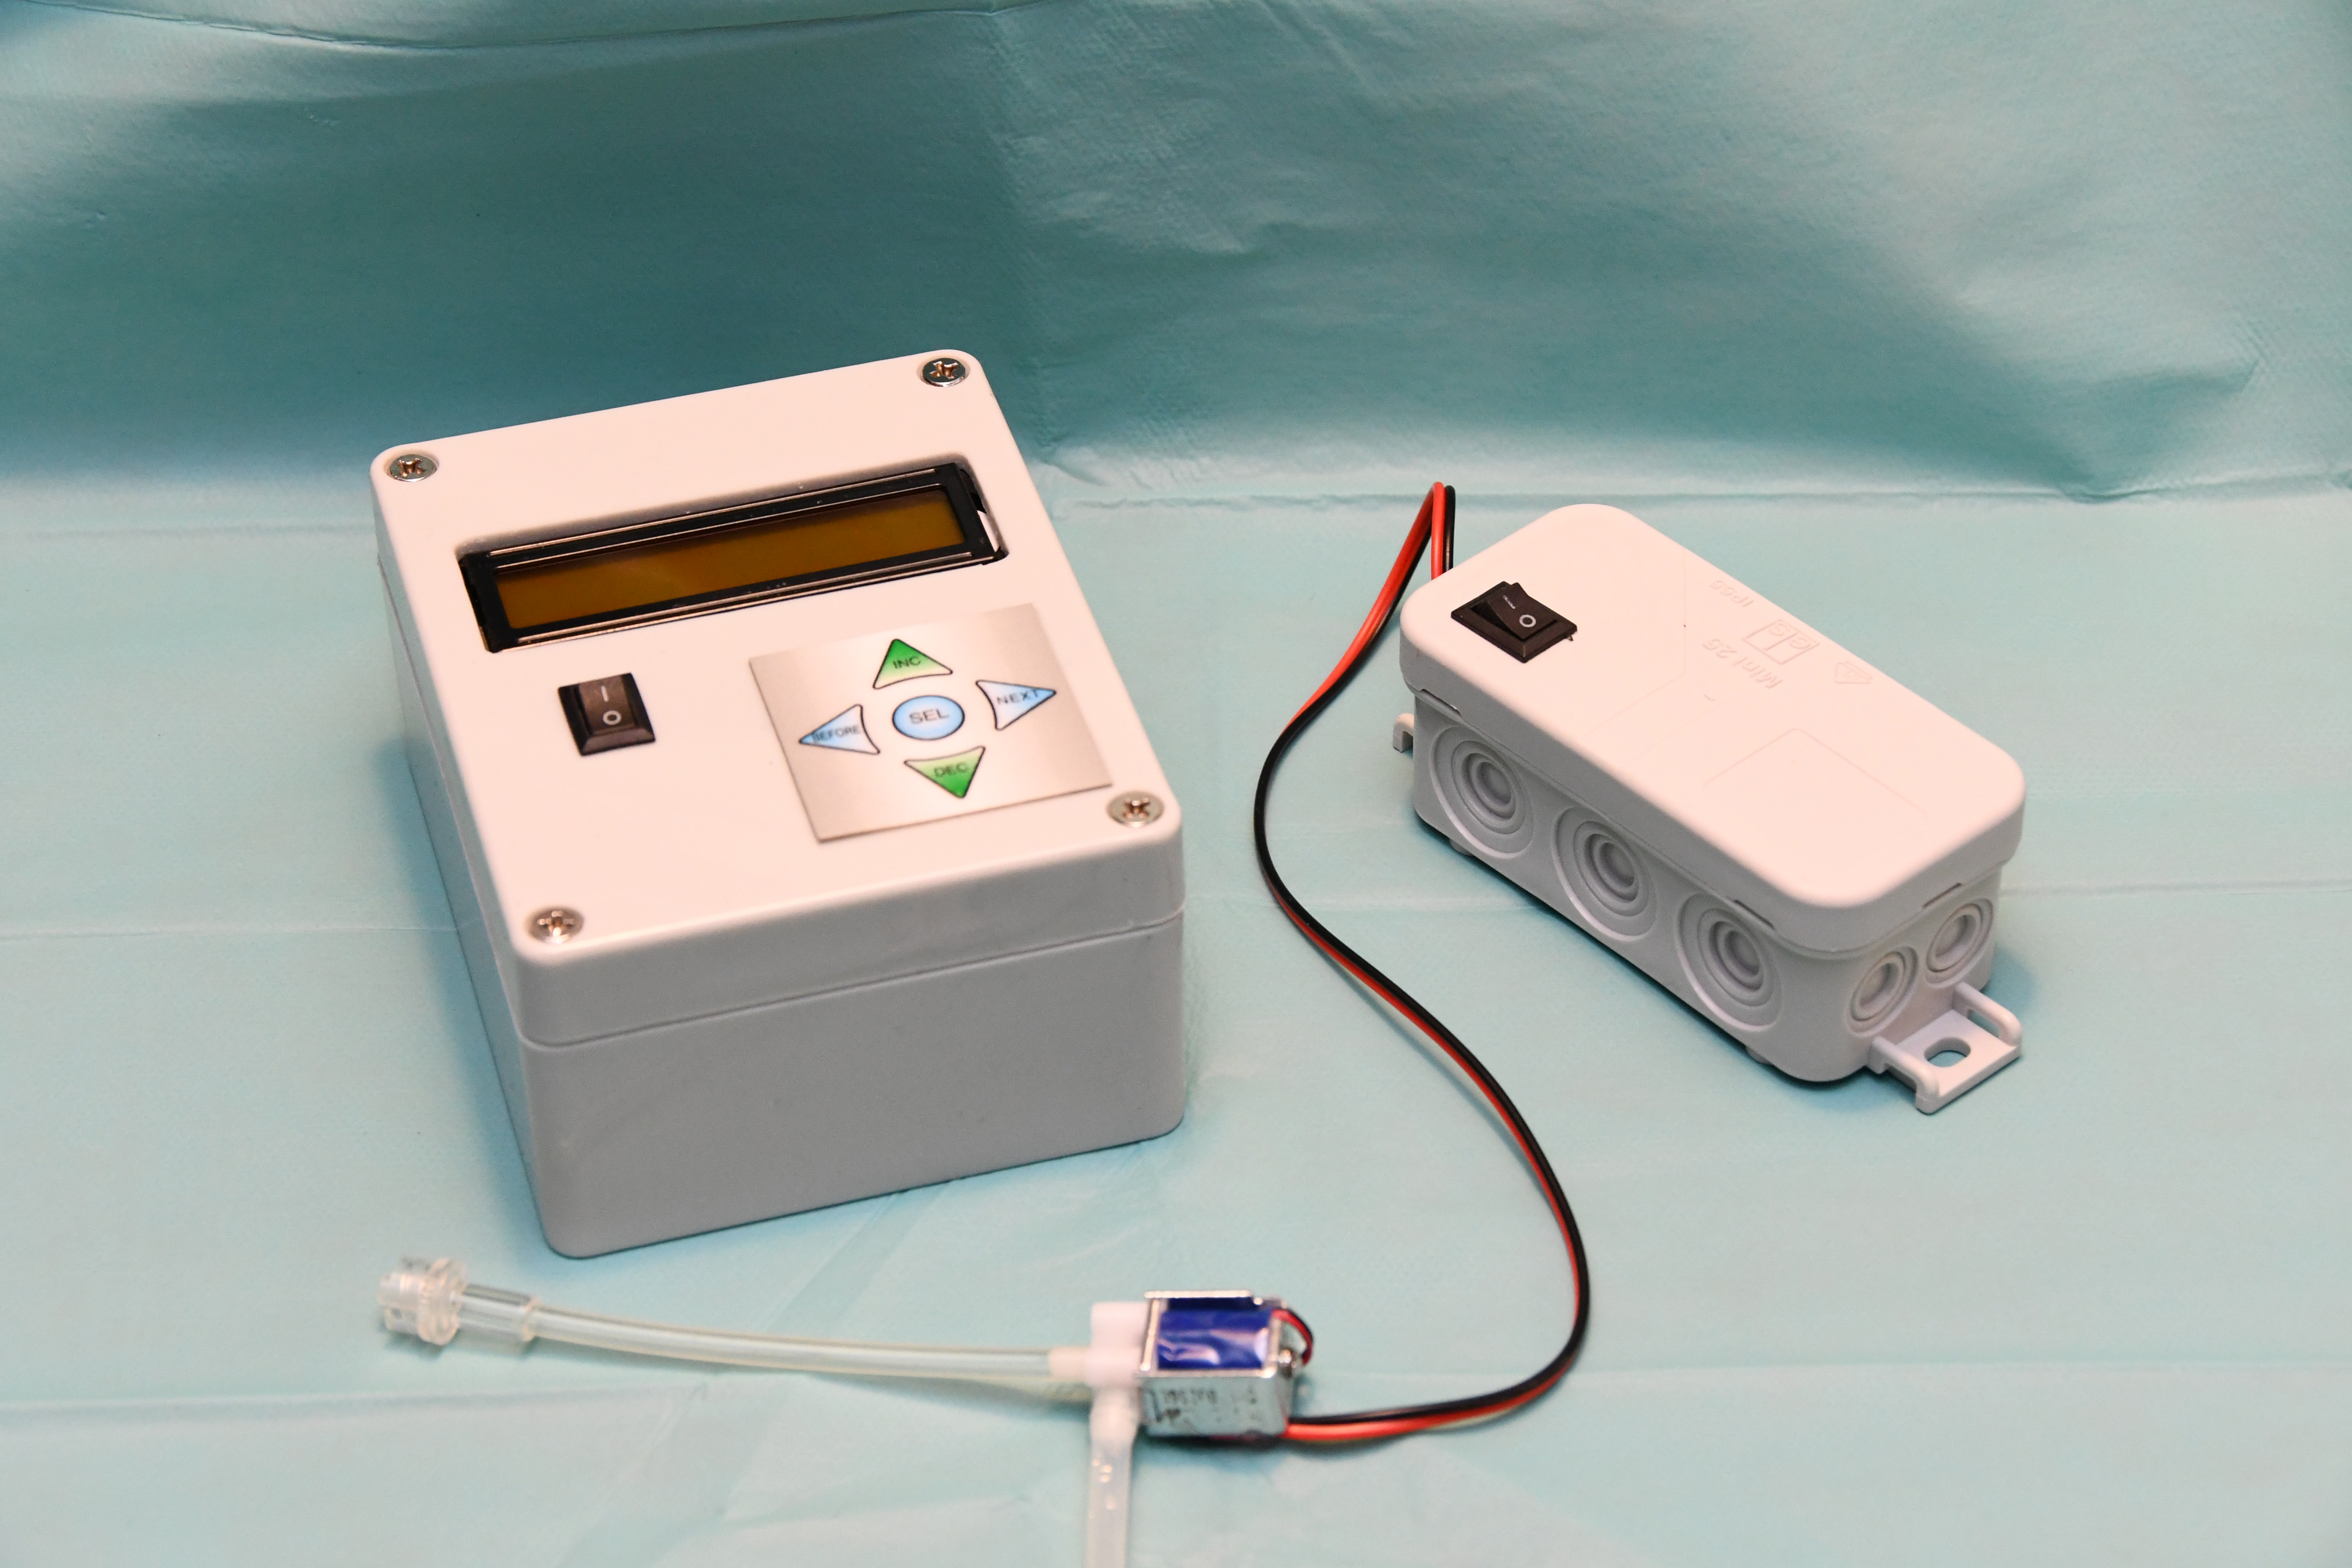
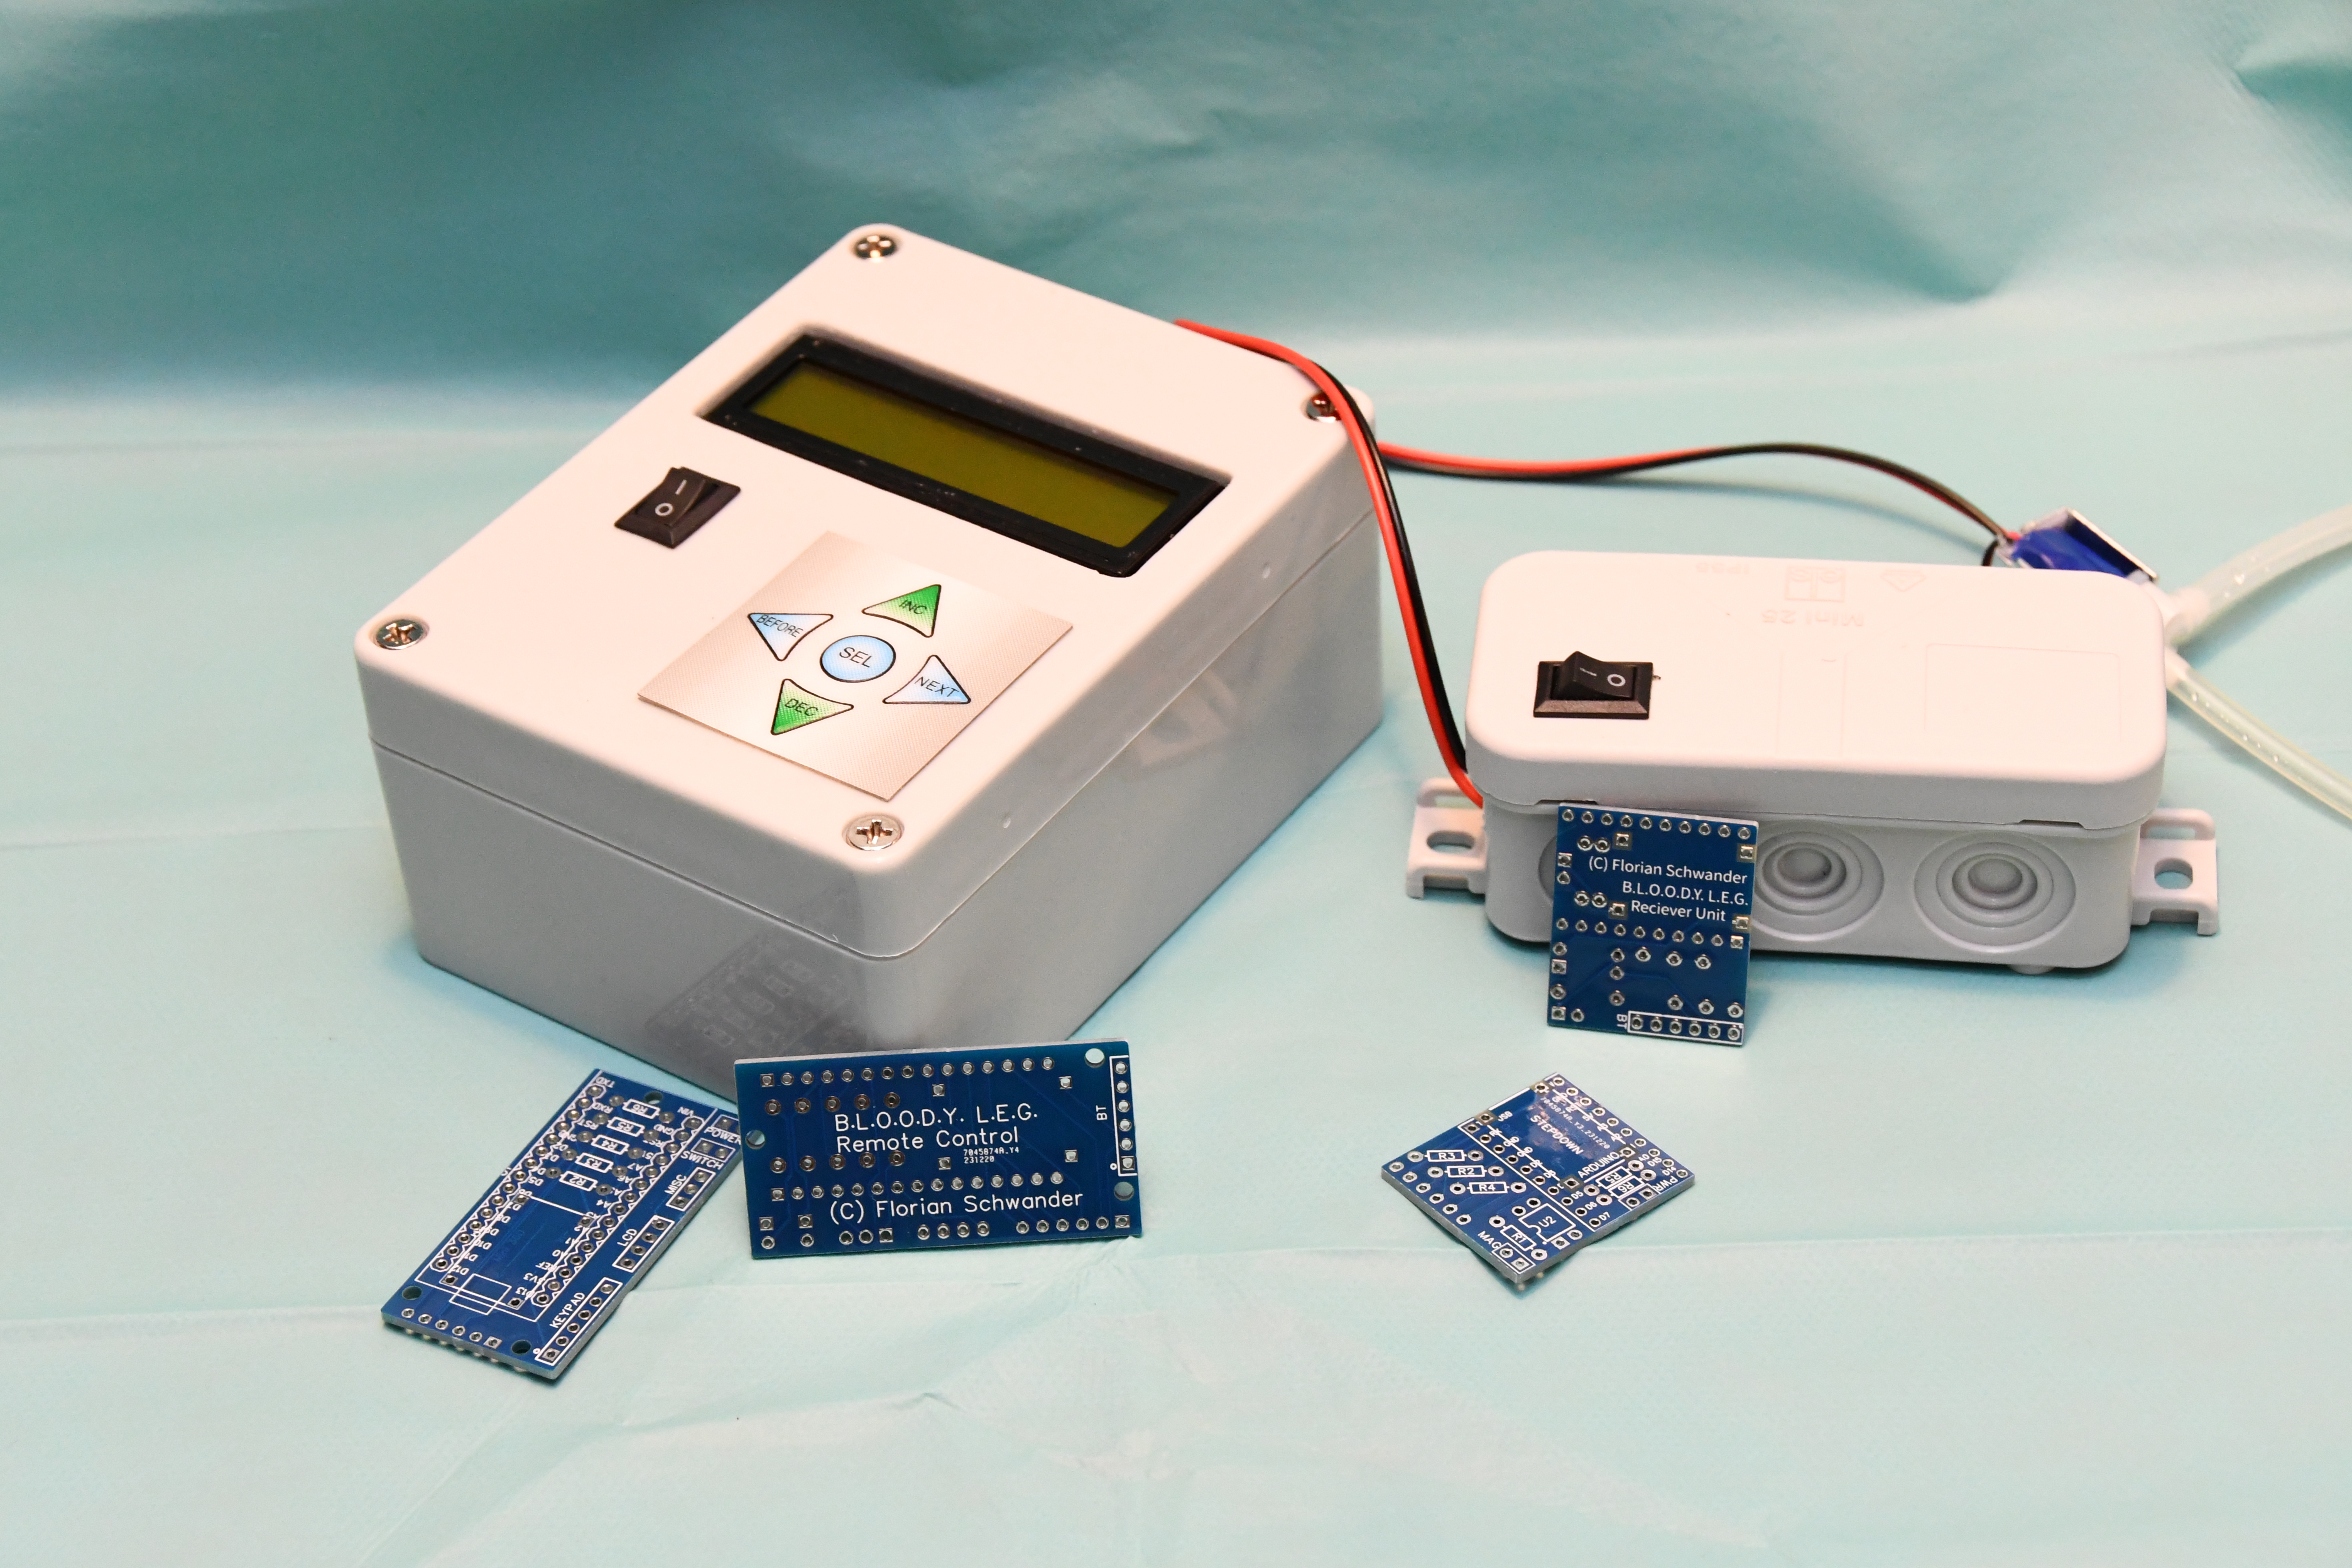
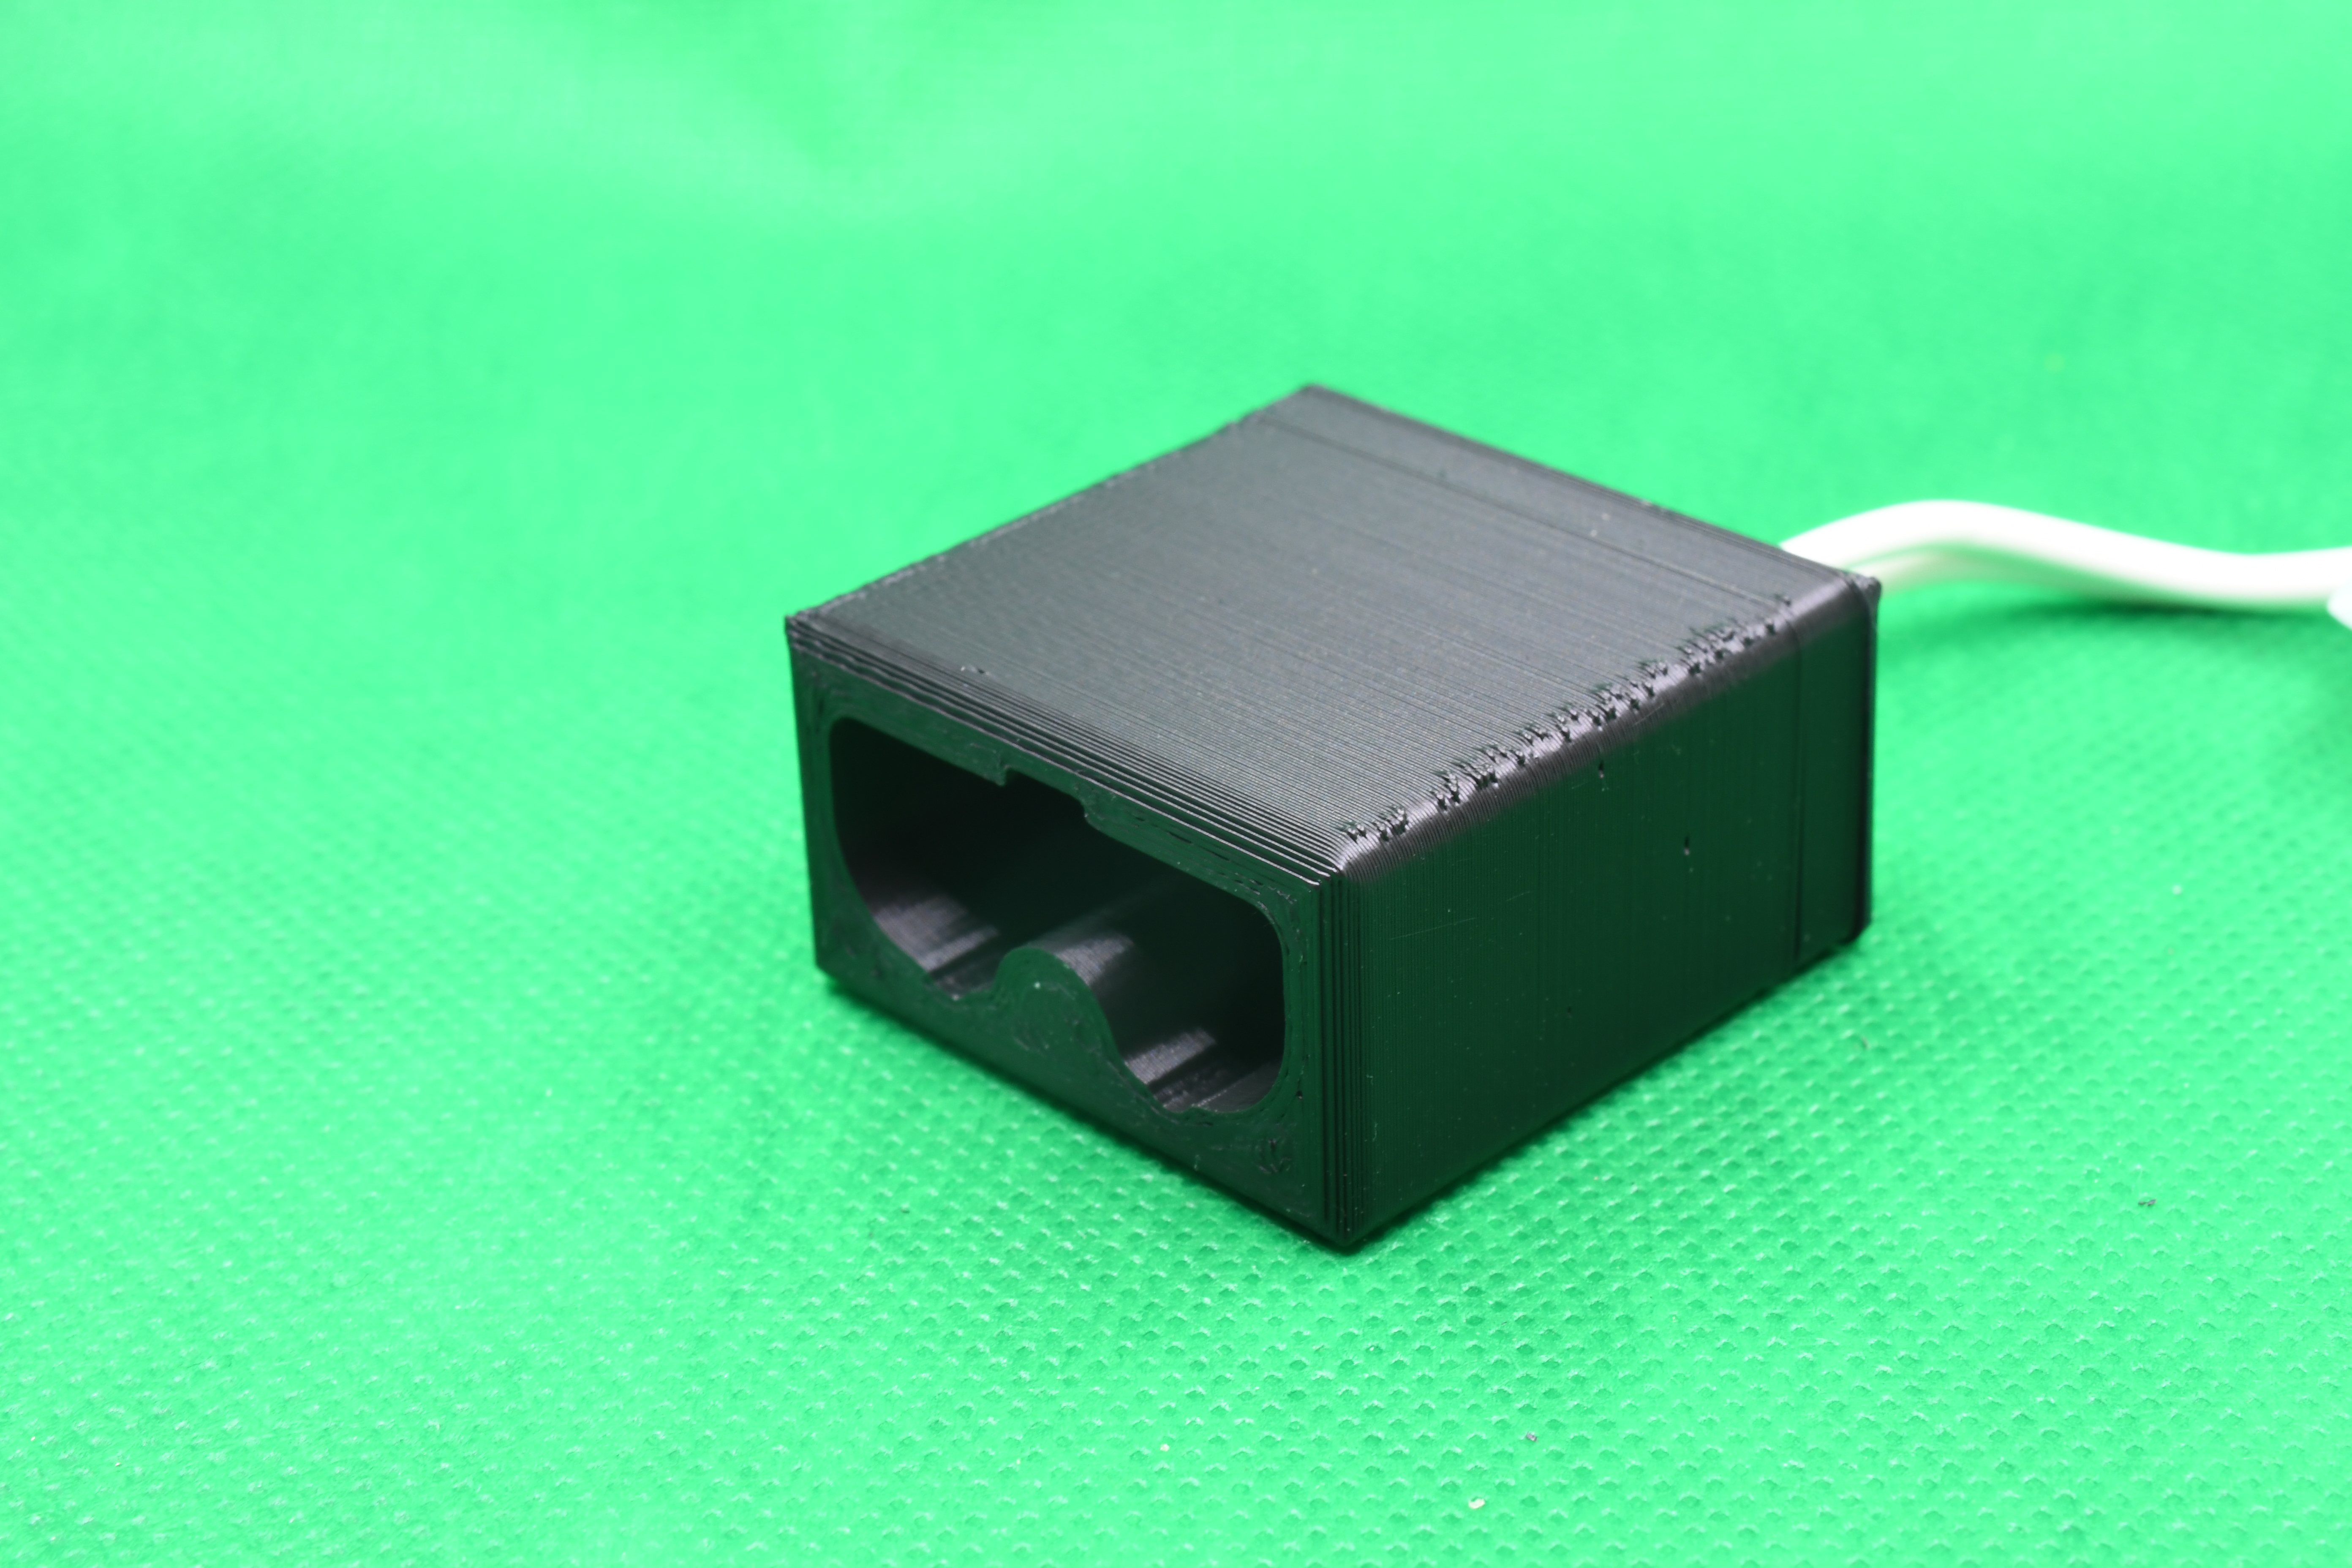
Remote control with LCD on the left, watertight reciever with small 5V solenoid on the right. The reciever box fits into the old leg, as it has the same dimensions as the old box.

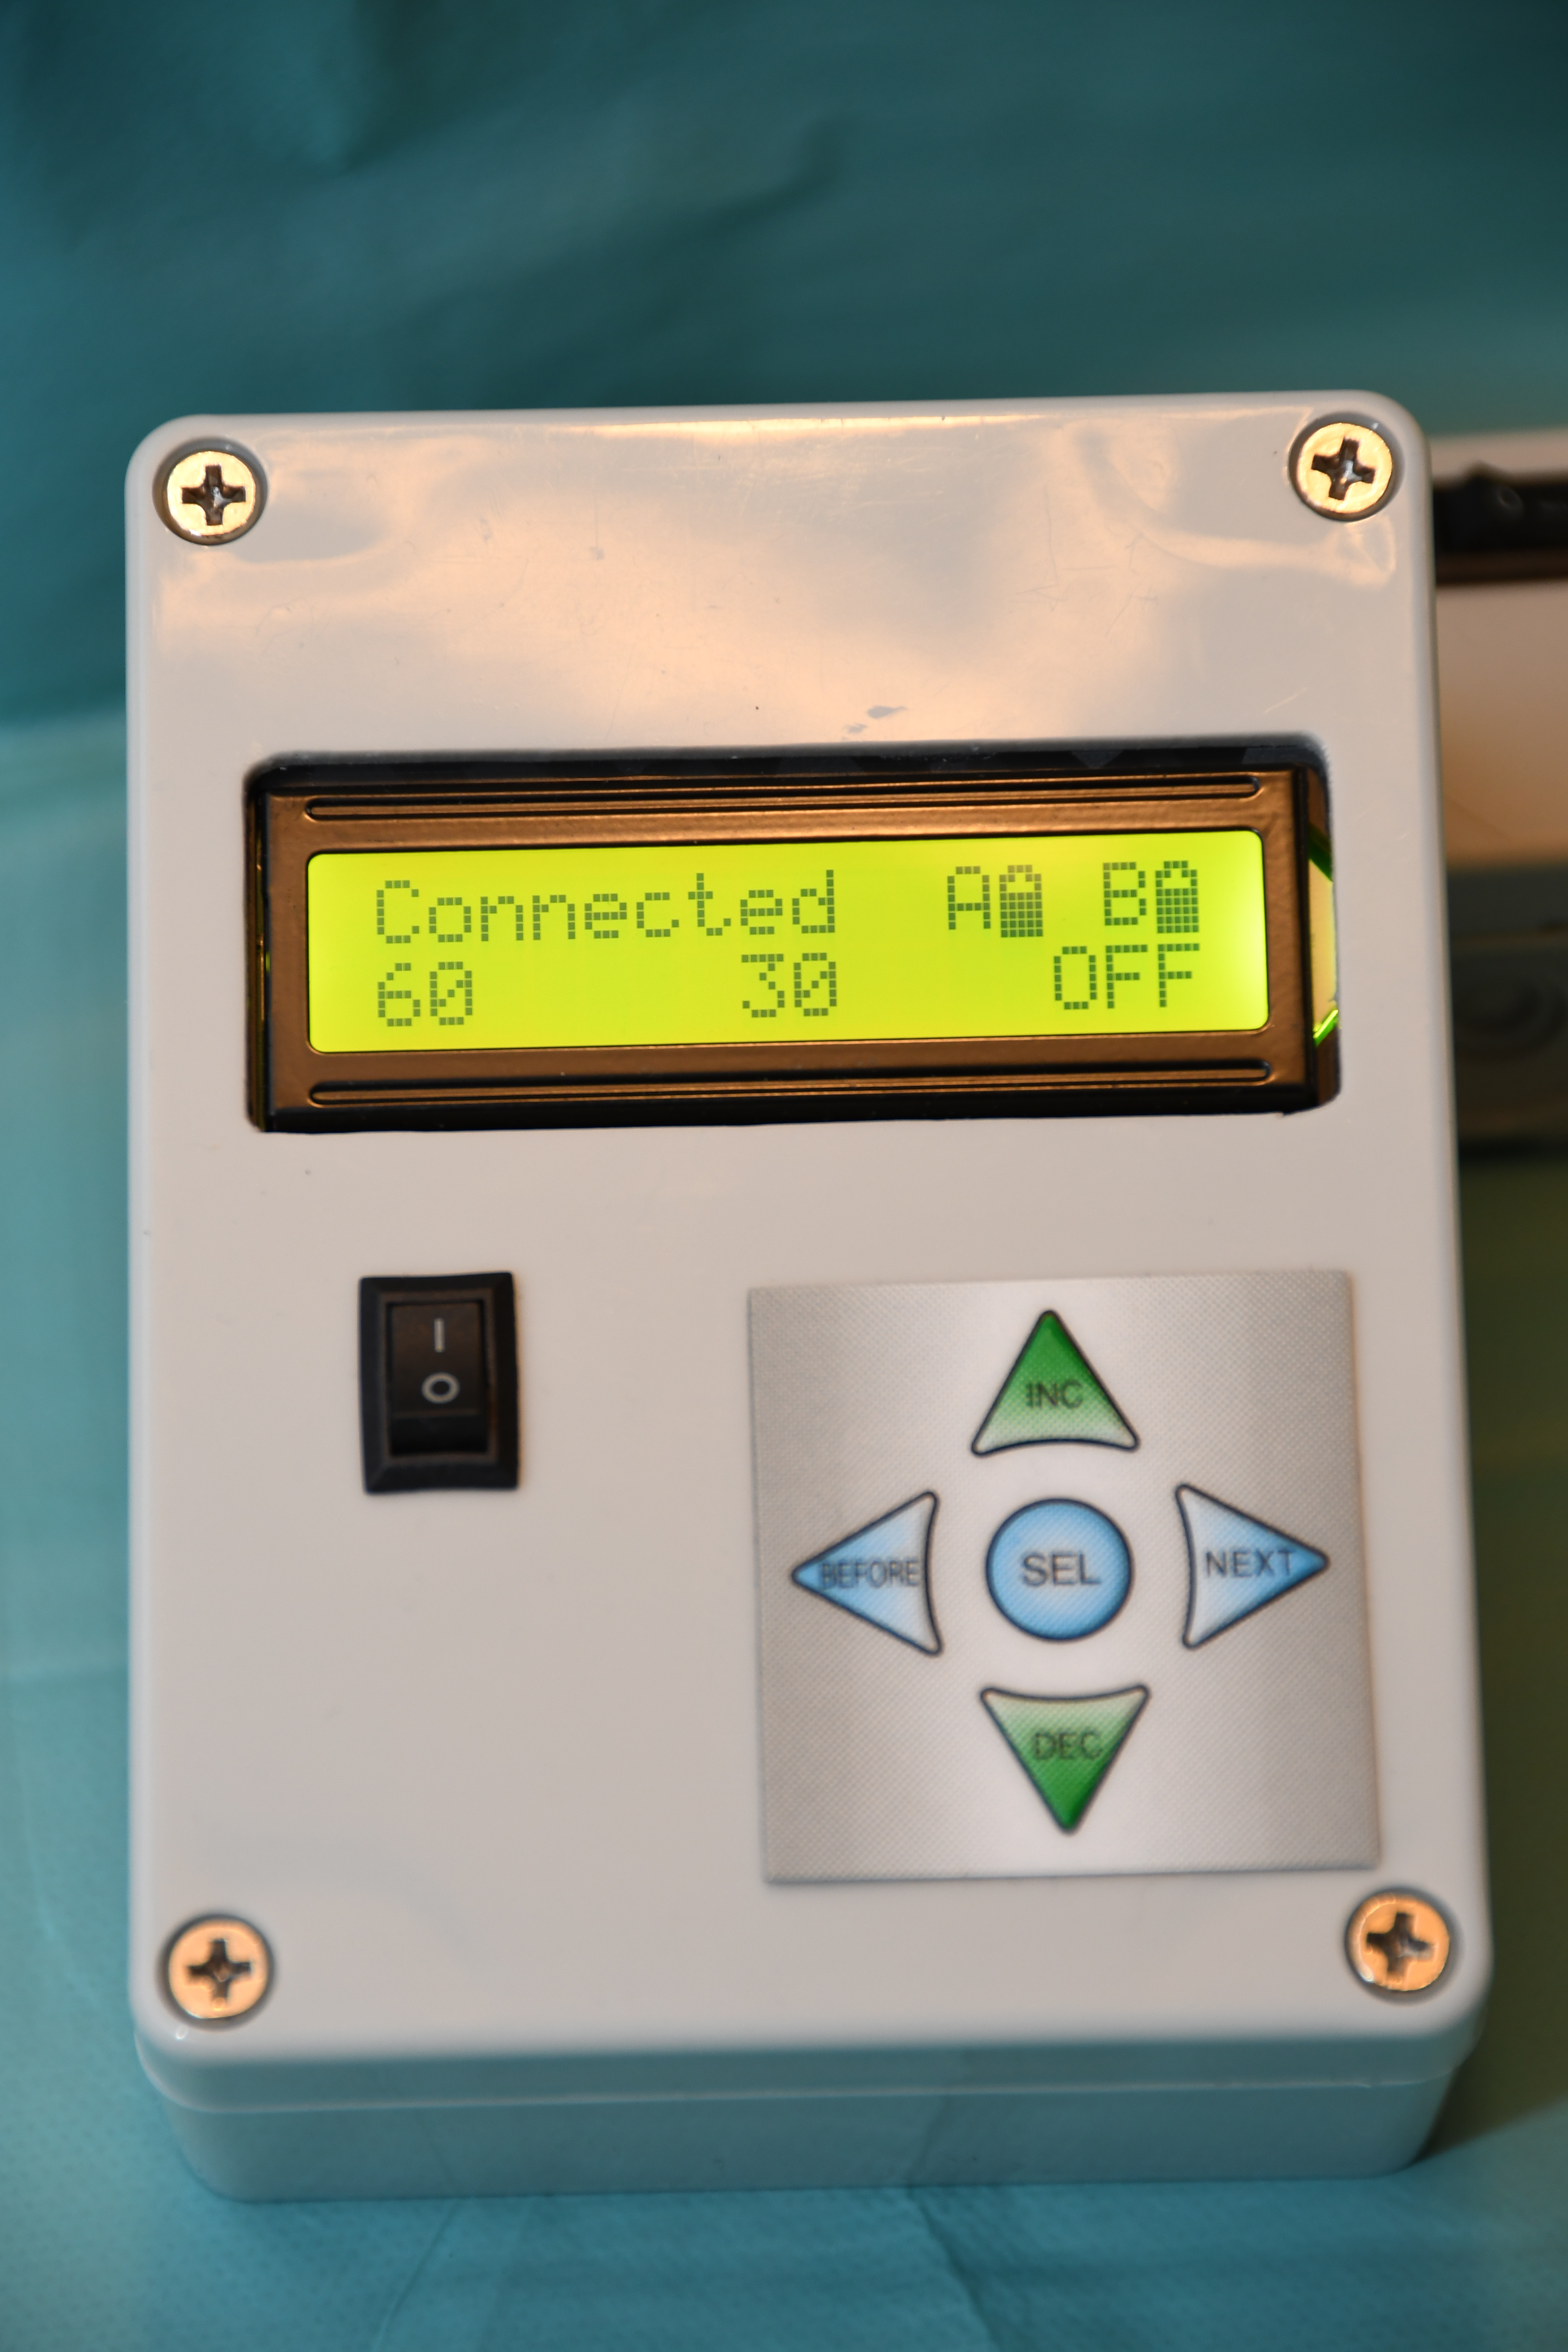
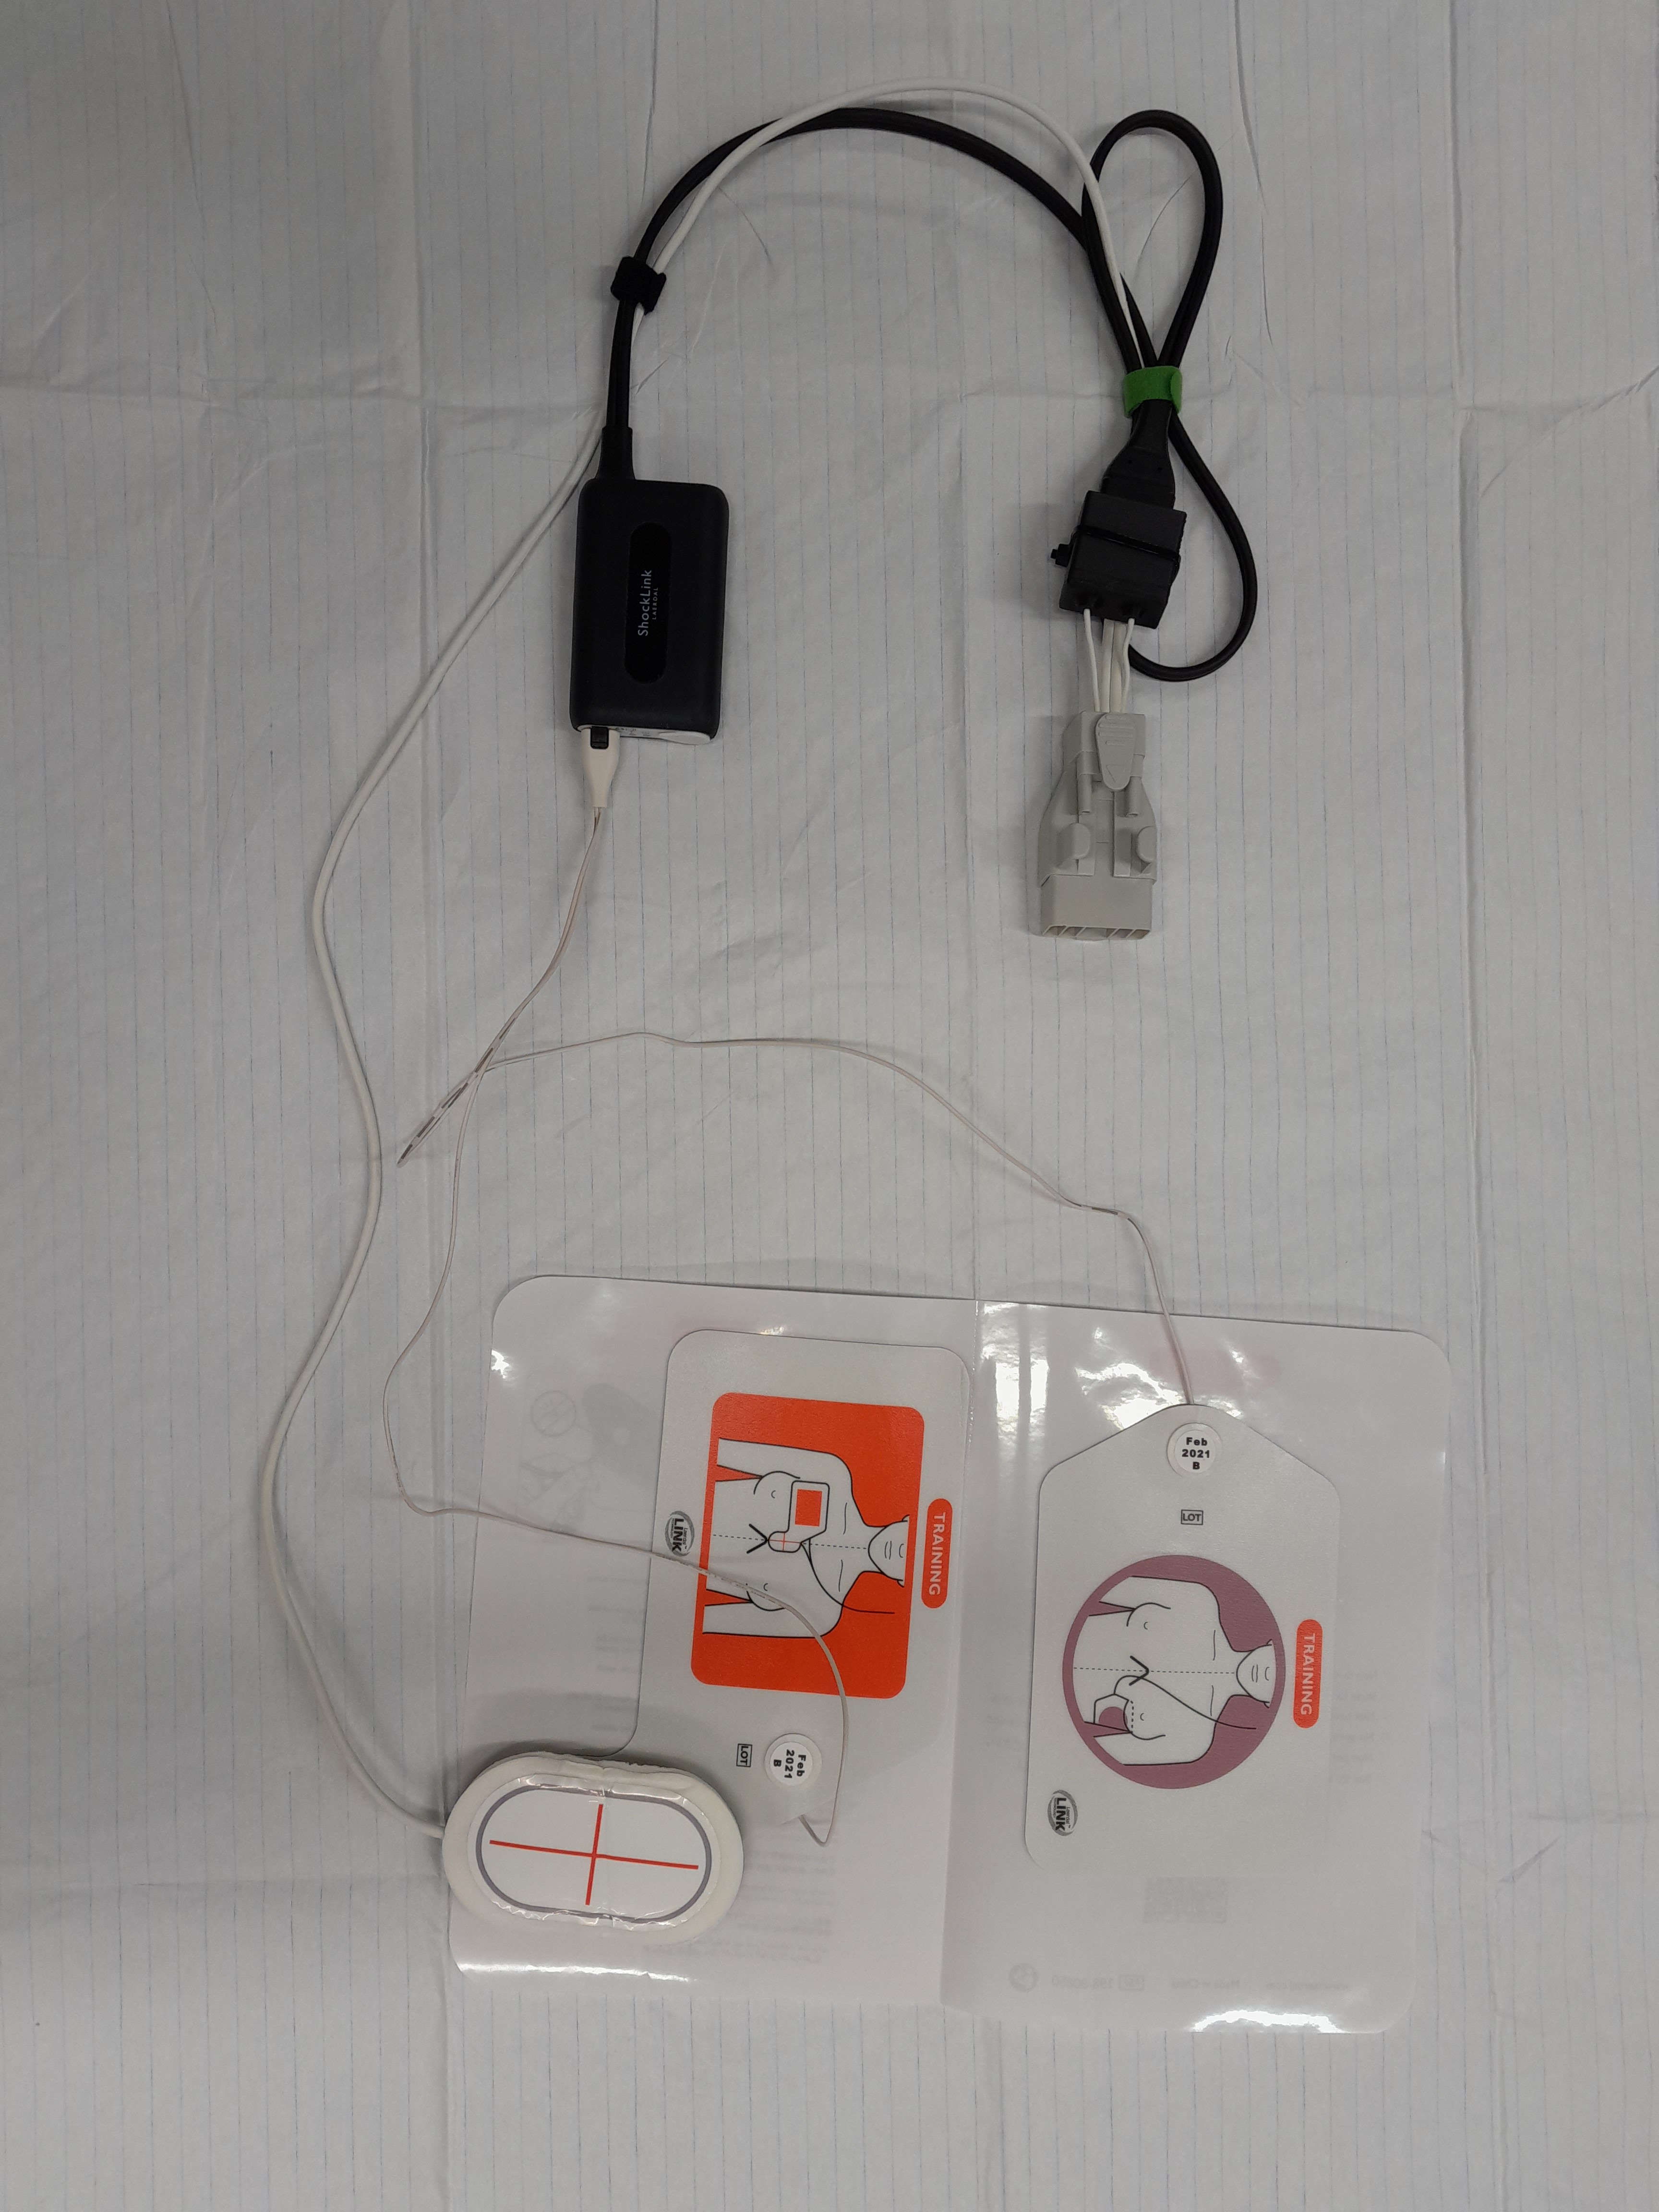
LCD showing the connection status, charging state of remote control (A) and reciever (B). The blood flow ist set on 60 bpm with 30% volume and is currently off. The black switch turns everything on and off, the membrane arrow buttons control the settings, the middle round button turns the flow on or off.

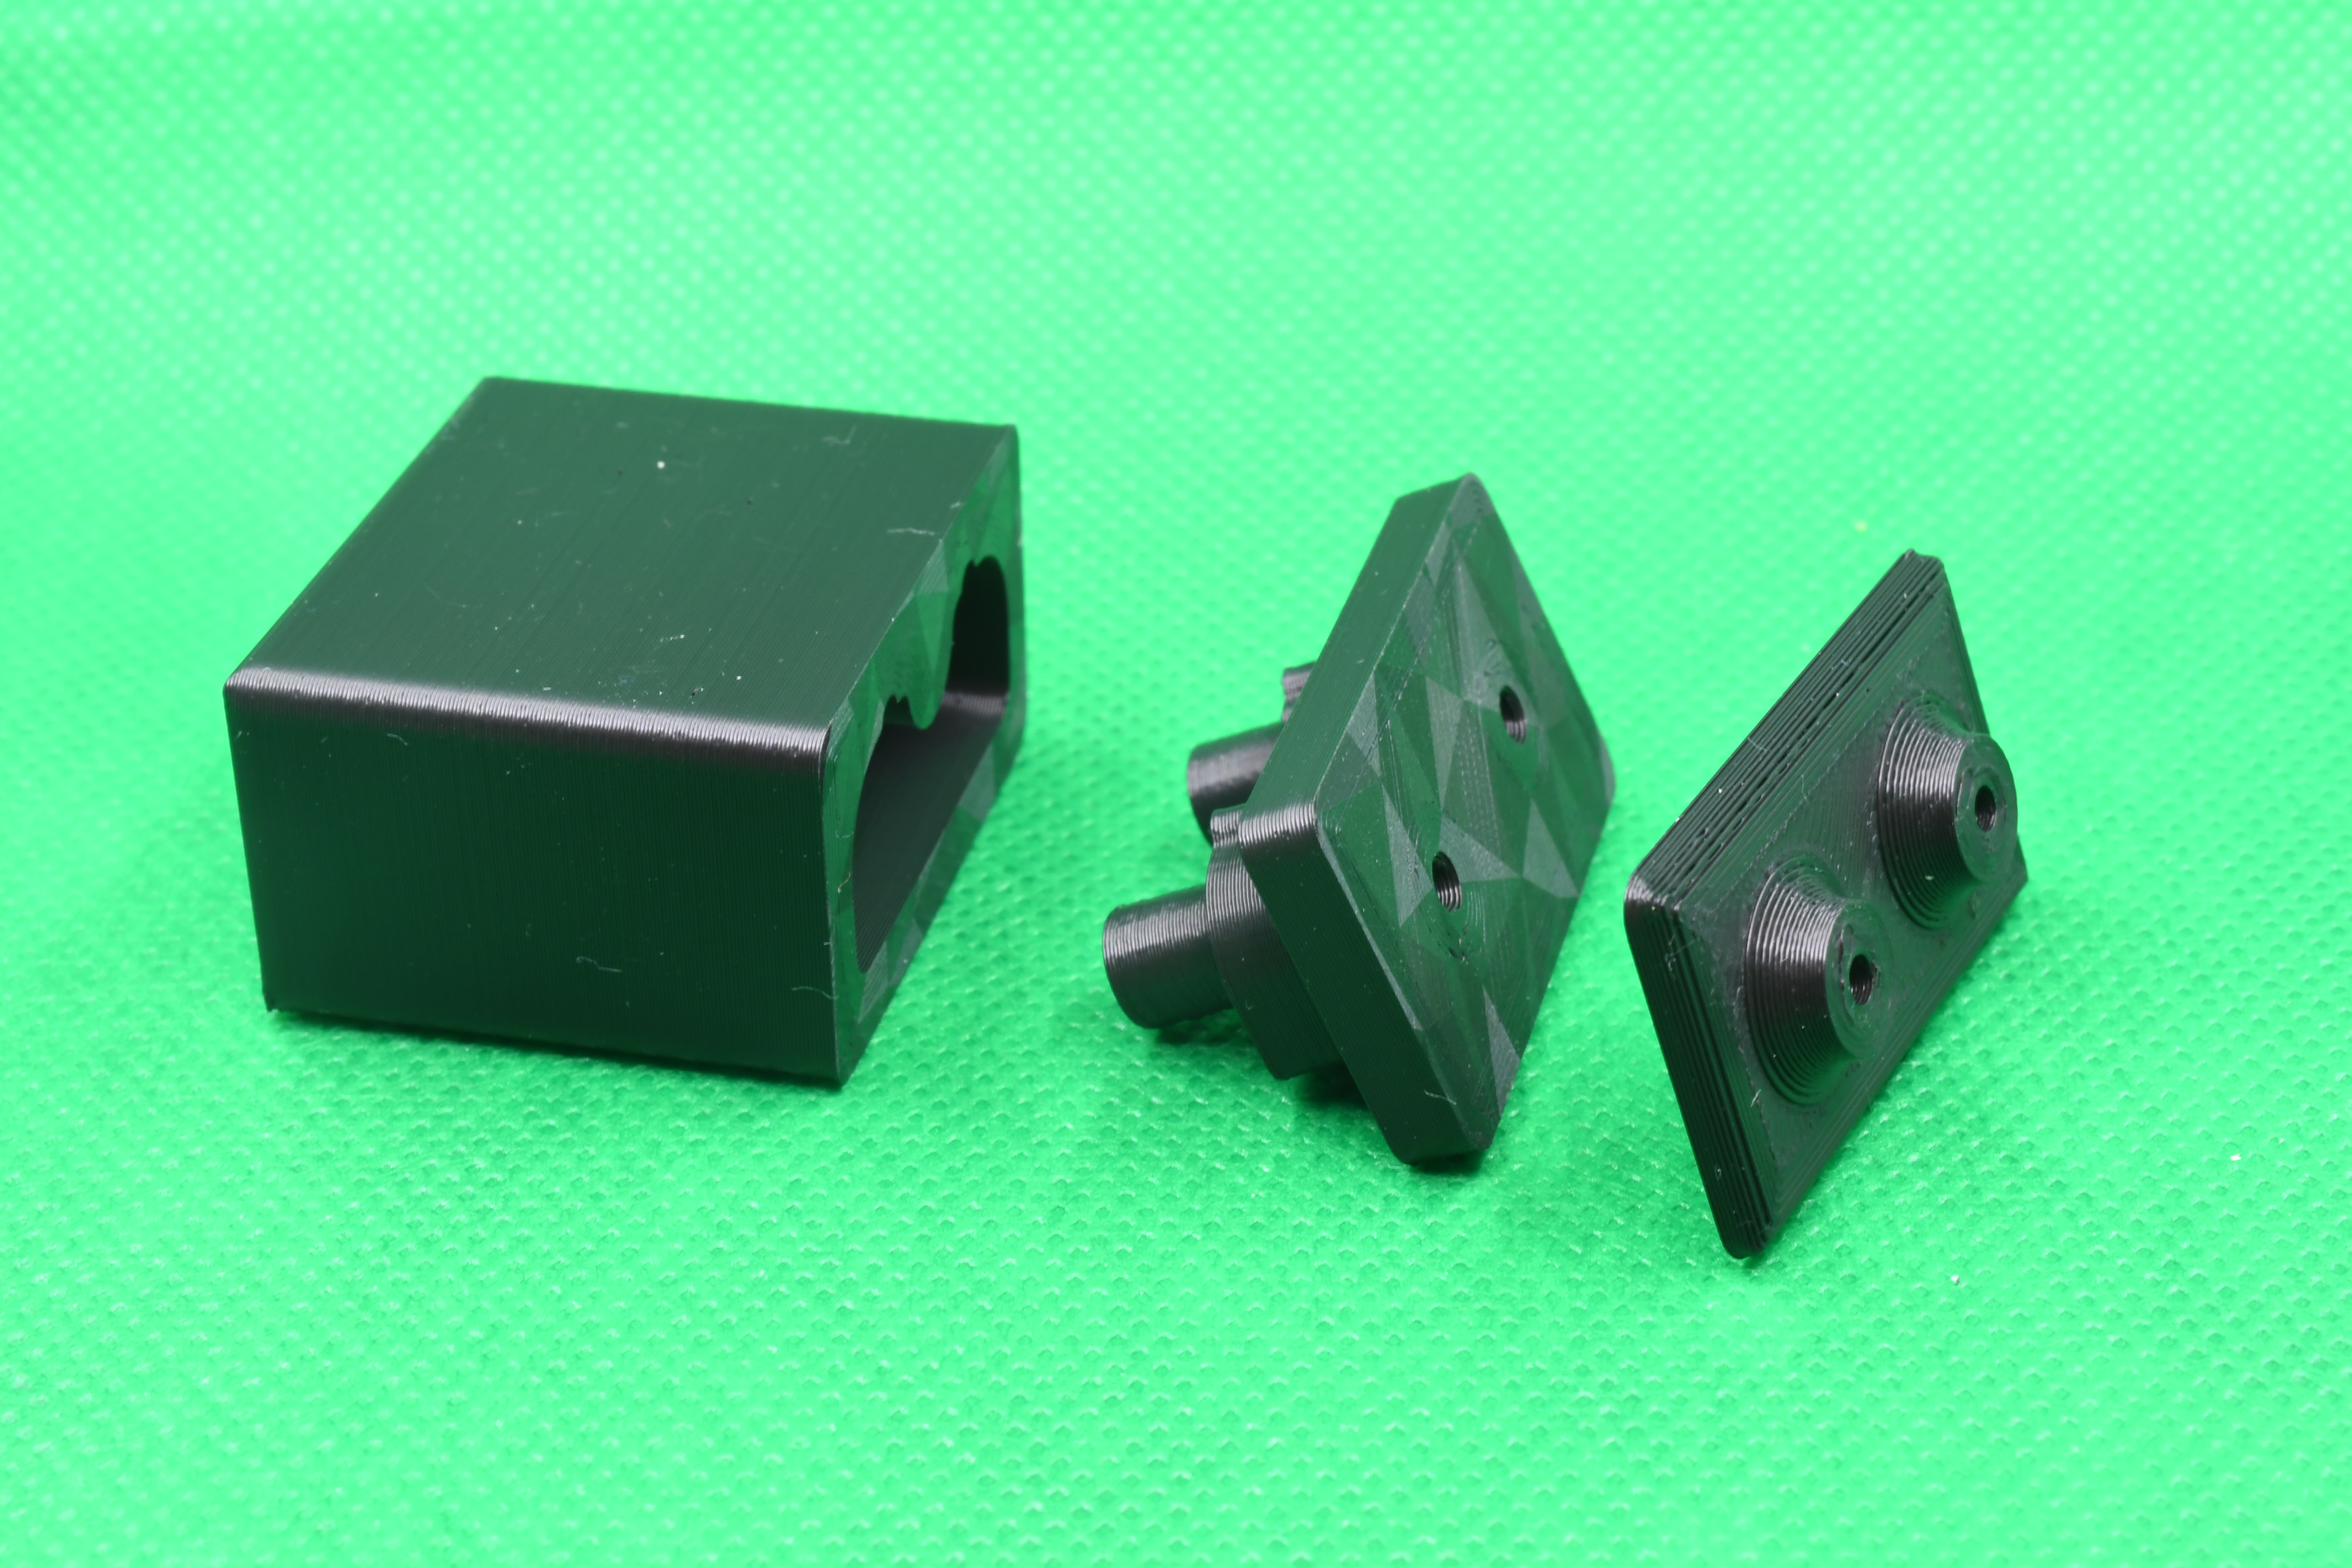
The reciever electronics are very compact and fit into a watertight housing, together with a 9V battery. Instead of installing this in a leg, one could also use it on other maniquin body parts or even on a standardized patient. Instead of the syringe/spring pressure reservoir, one could also use a pressure infusion bag.

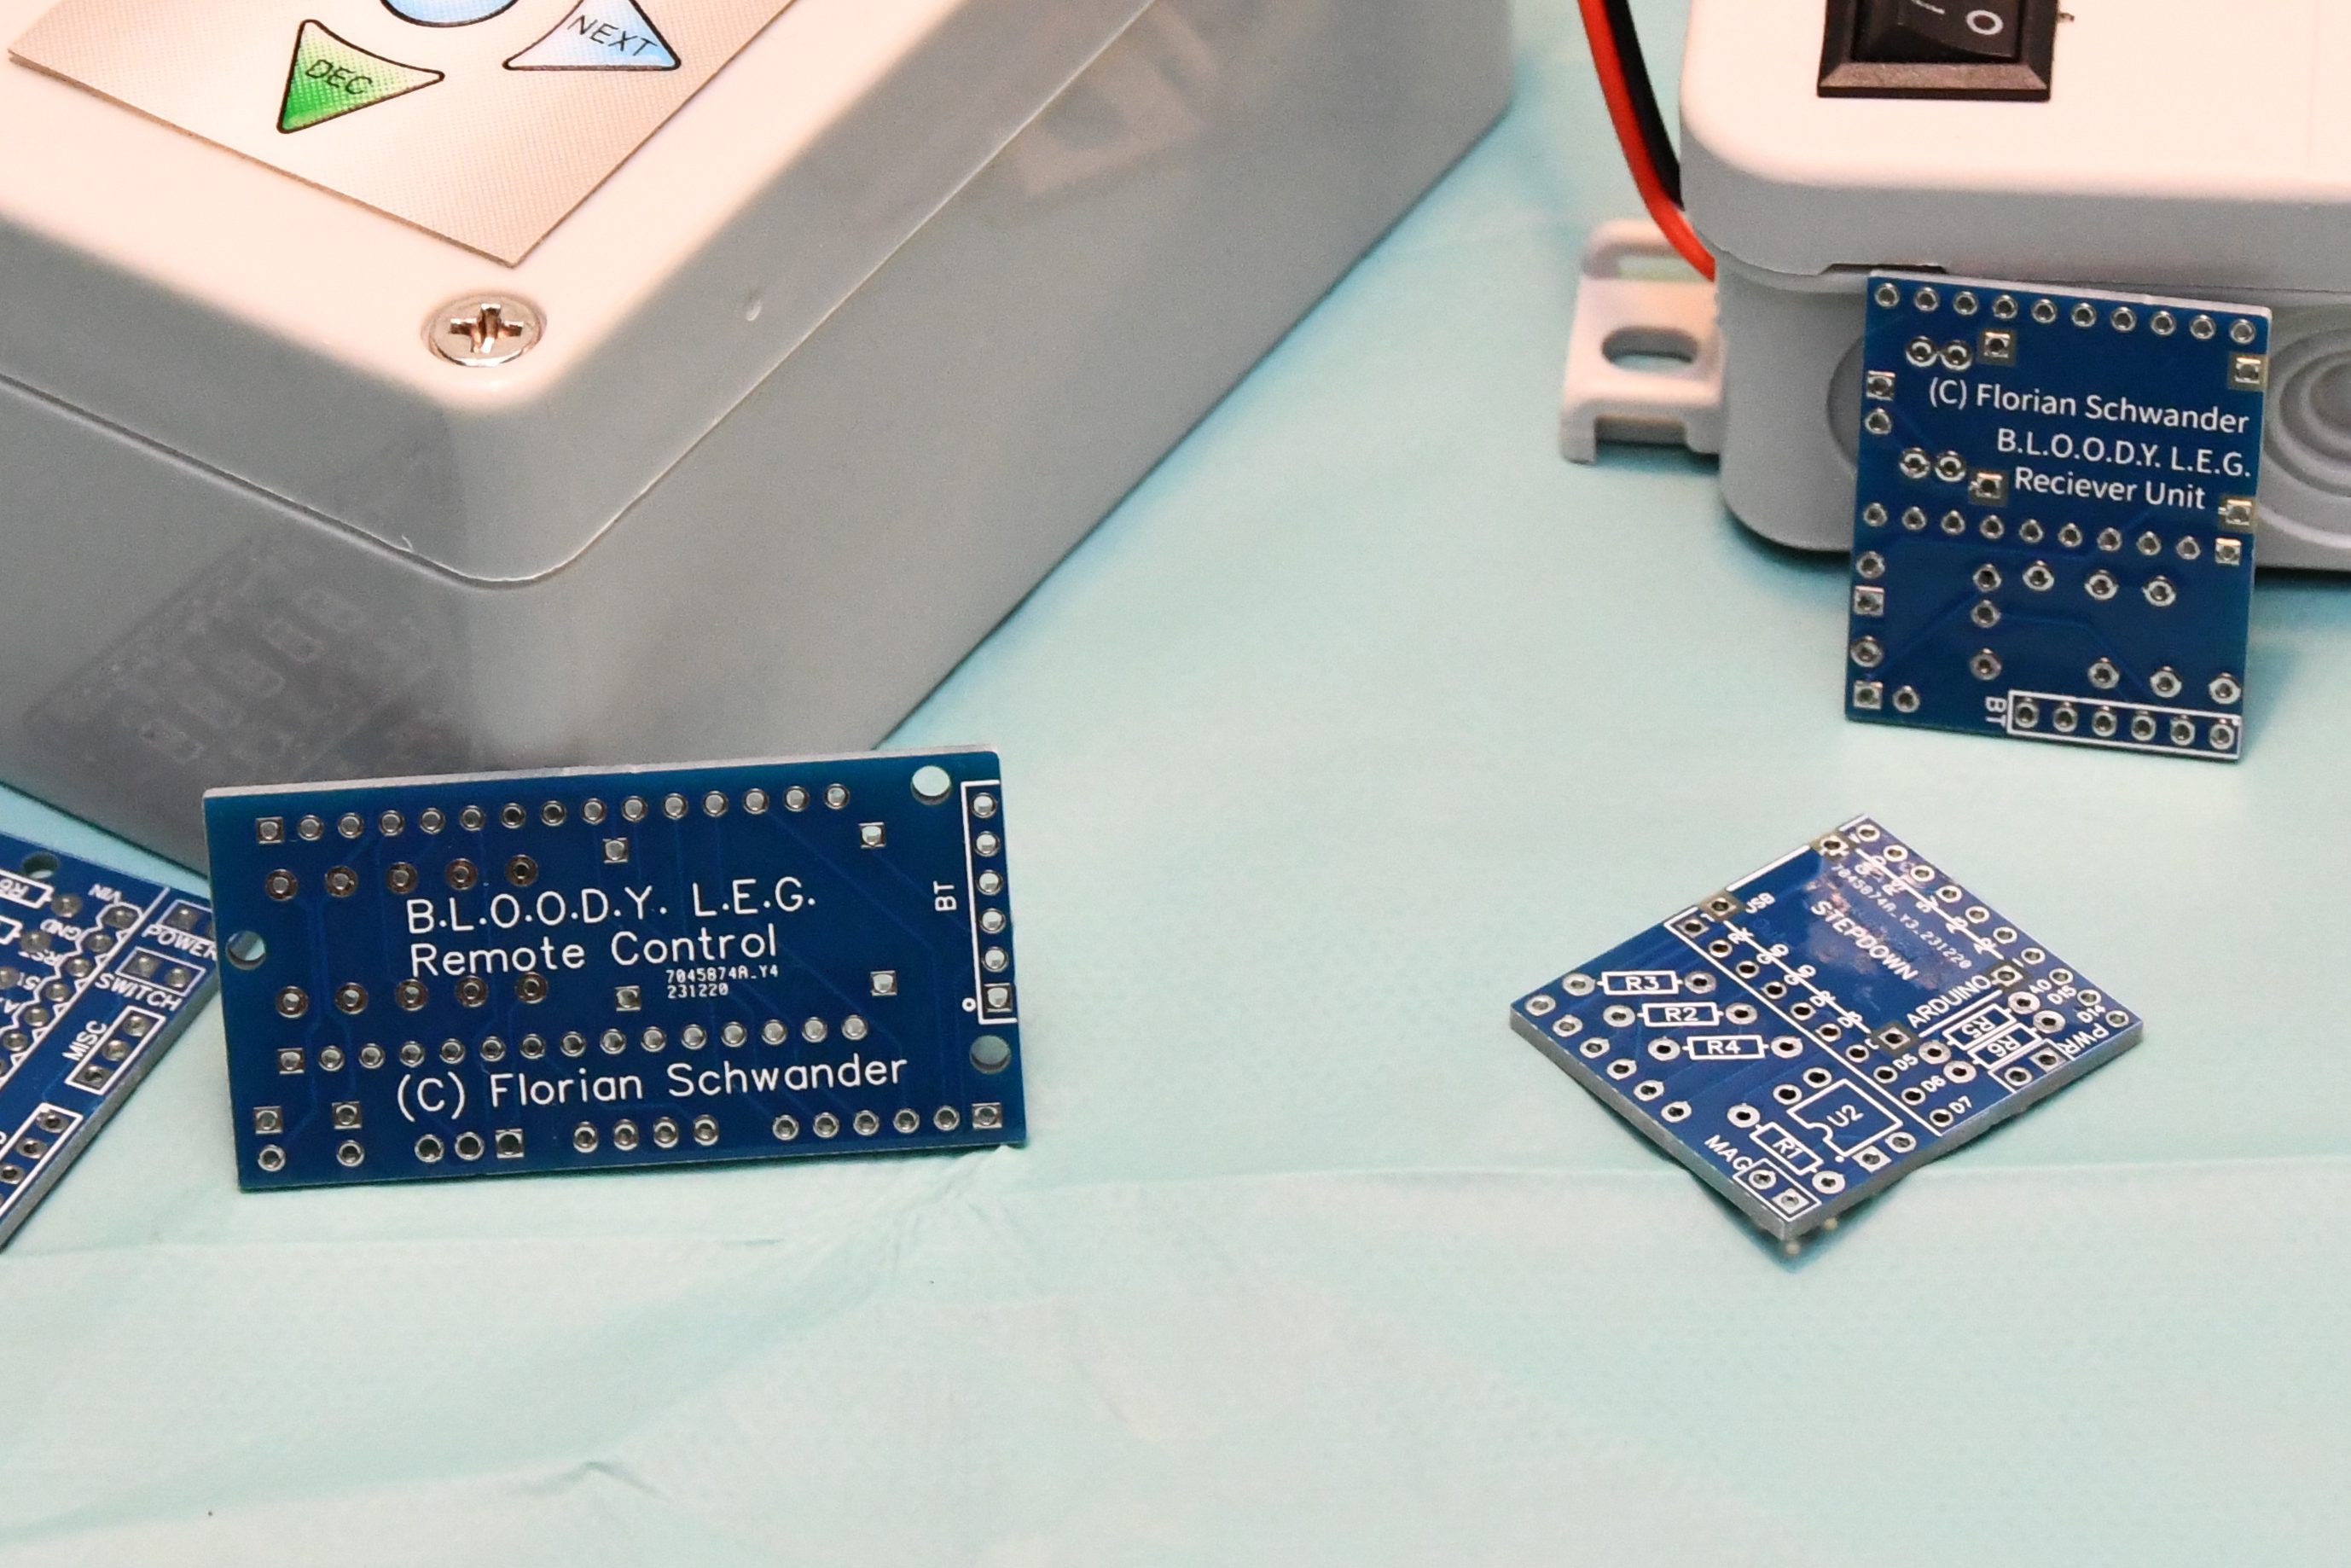
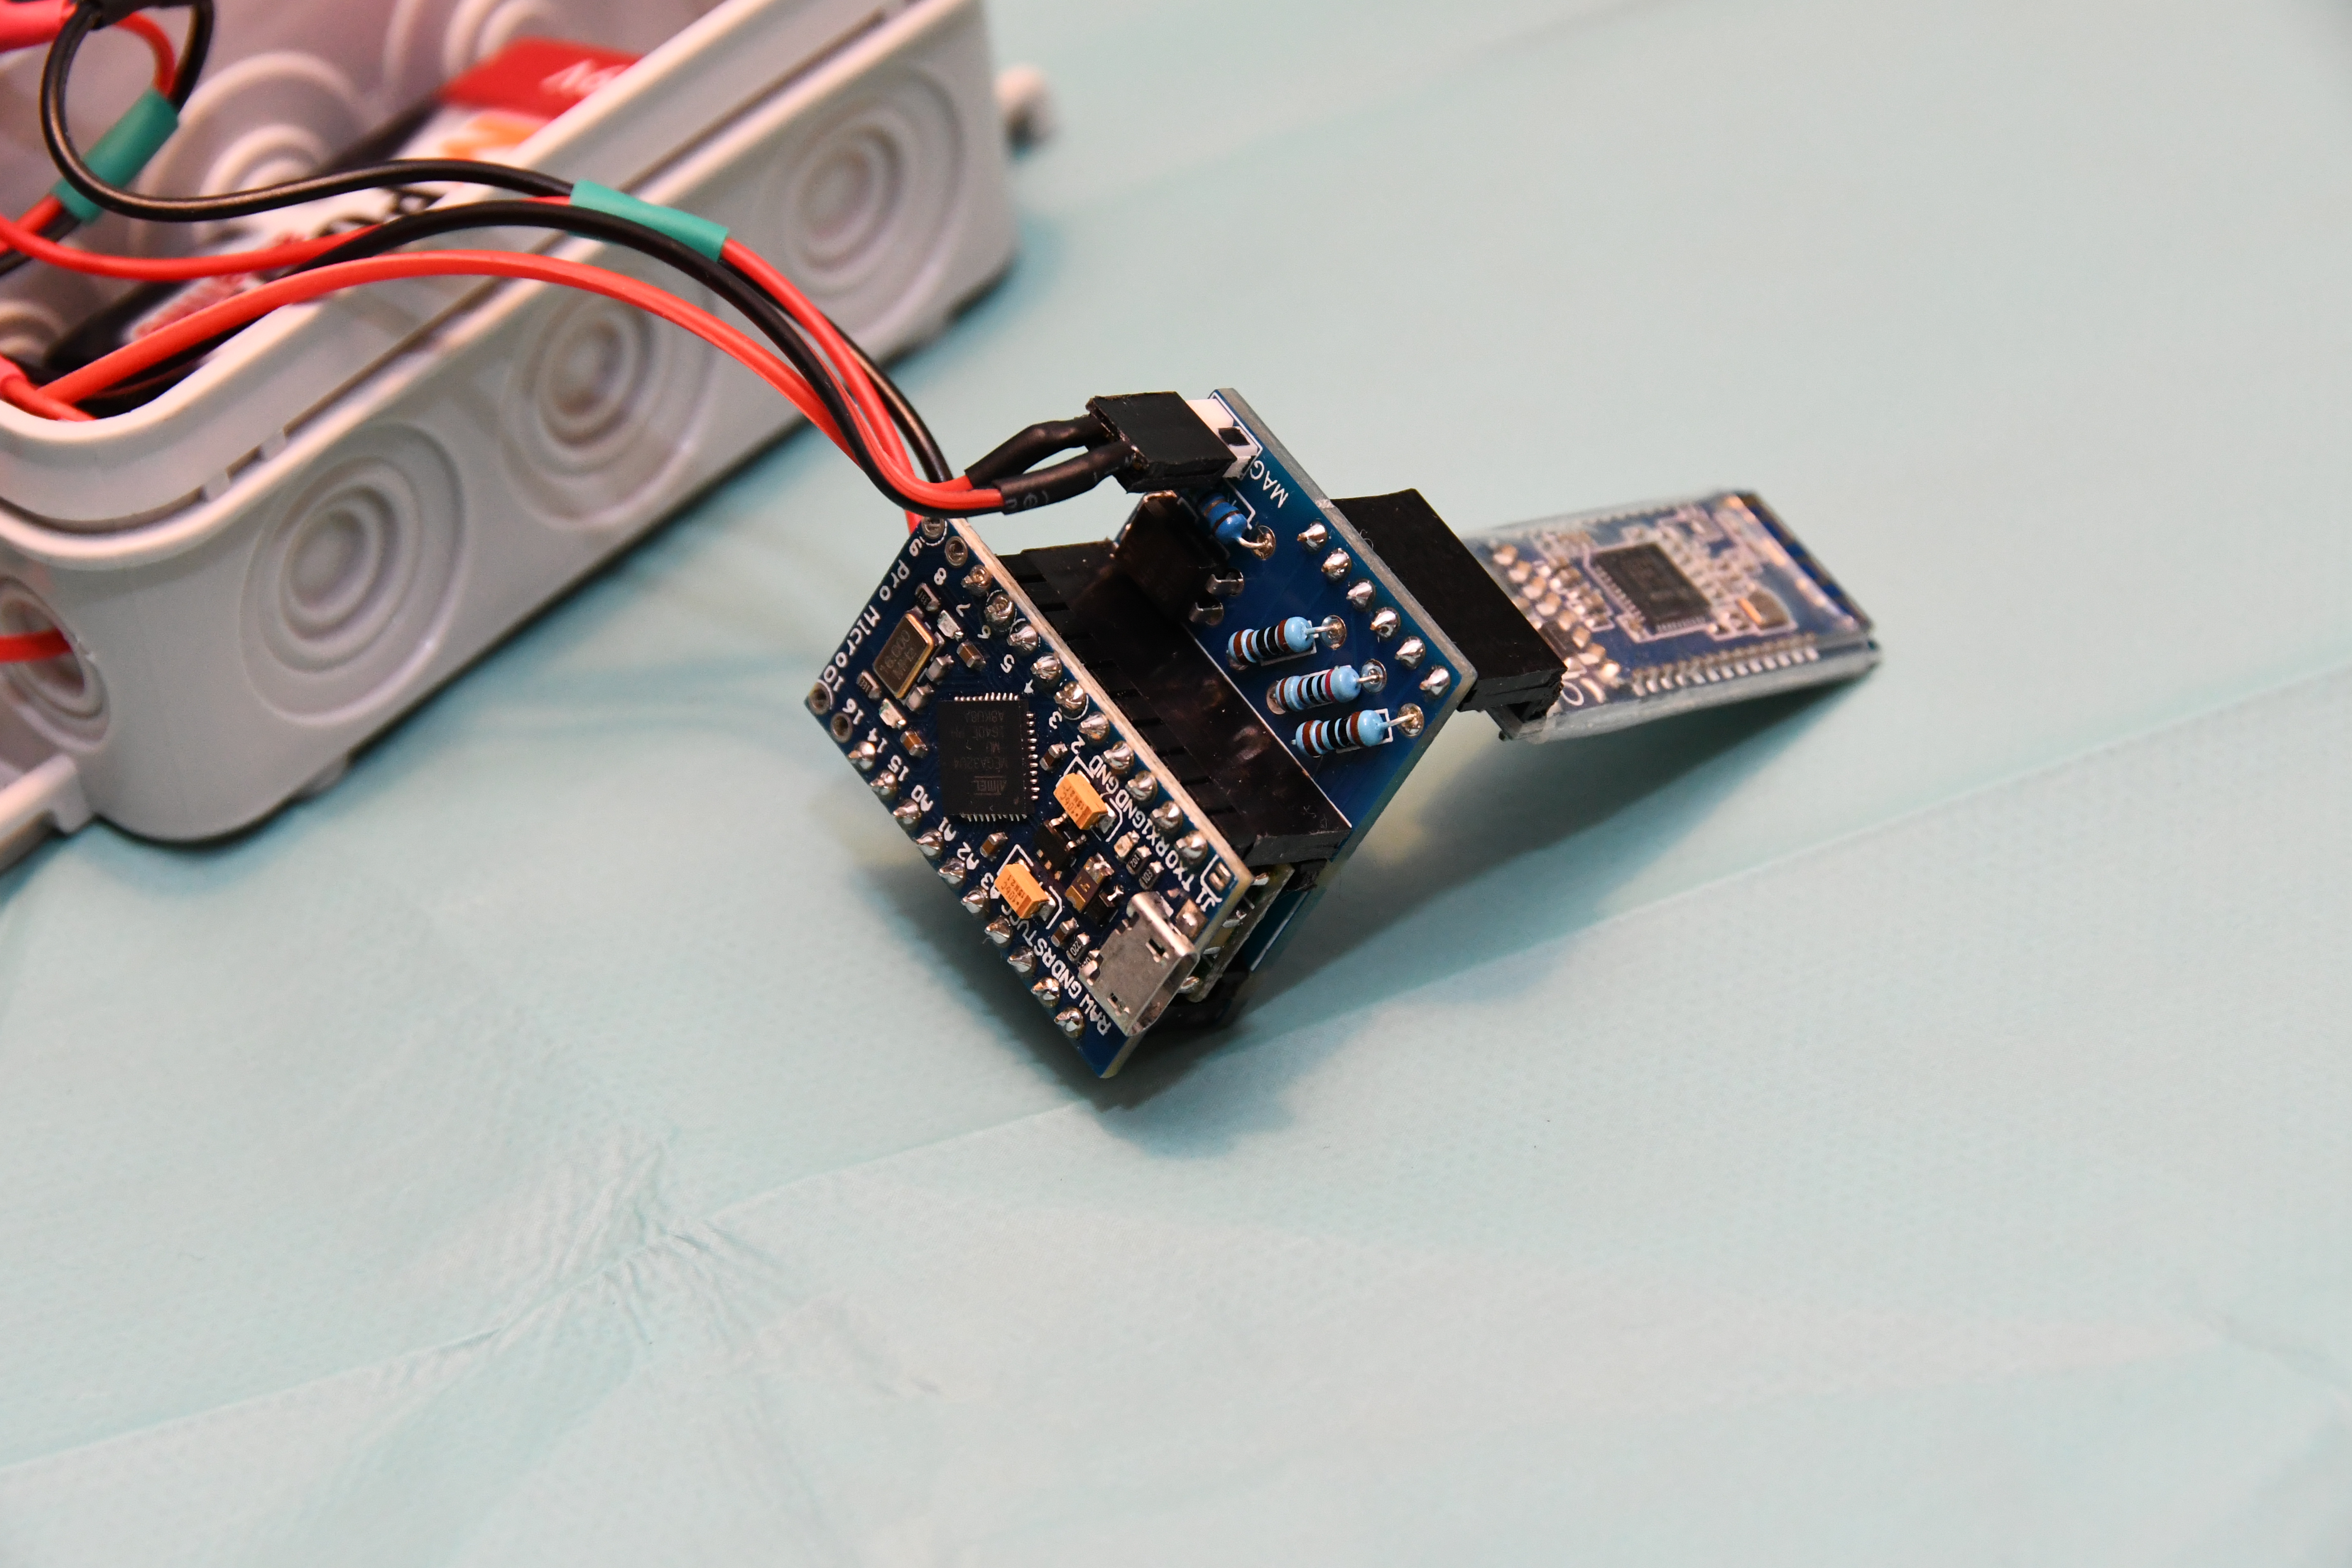
For both elements I desinged a custom PCB to solder everything together in a very compact manner. See this making-of video for a timelapse of the soldering process.

Please let me know if you are interested in making your own BLOODY LEG. I will write down some instructions for you and send you the arduino code, the scematics and the gerber files for the PCB. IMPORTANT: If you life in Switzerland, I could send you a pair of blank PCBs (I have some left). Just let me know in the comments. For all other countries: Sadly, the Swiss Post is so expensive, that you will be better off ordering the PCBs directly from a manufacturer…

DIY-Connector for ShockLink

At my shop, we recently bought the ShockLink training system from Laerdal. It is basically a cable to put between your live defibrillator and manikin, with a built-in ECG-generator and energy dissipator. As with all Laerdal products, it comes equipped with a defibrillation electrode plug for Phillips-brand defibrillators. It’s a great product and really easy to use, even without a manikin. You can simulate defibrillating a bag of potatoes if you like.

The problem is: At my hospital, we only have Zoll R-Series defibrillators, which use different plugs. So we need to use an adapter to connect ShockLink to our machines.

If we want to use the Zoll CPR-Sensor, as we do in real life, we even need TWO adapters. One to break out the CPR-sensor from the electrode contacts, and one to connect those with the ShockLink cable. This has two significant drawbacks.

First, cost, as the adapters are over 100 $ each. If you are the unlucky owner of a Corpuls defibrillator, the adapter is even priced at an insane 424 $!!!

And second, ergonomics. Instead of one cable from defibrillator to electrodes, you get a bunch of them, with y-pieces and an unwieldy adapter in the middle. Instead of ACLS-skills, you need a bachelor degree in advanced cable management, as you can clearly see in this Laerdal video.

So, long story short, I designed a more practical and cheaper solution: A 3D-printed connector to put on a Zoll OneStep CPR electrode plug. You can find the stl-file at Thingiverse. You will also need two small banana-plugs like these, a soldering iron and some glue.

Parts A, B and C after printing
Banana plugs
Solder the cable to the plugs, secure with screw. If you don’t know which cable goes where, you should probably not be doing this!
When you have both cables in, glue the base plate on. Only of course you have forgotten to thread it on the wires before soldering in the first place, so you will have to desolder the whole mess and do it again 😉
Voilà!
The finished adapter is the black box between the grey Zoll plug and the green band on the top left. I would have liked to shorten the thick black cable to the ShockLink box, but this seems to act as the resistor (gets warm after shock). So I won’t touch it, just coiled it up a bit.

Disclaimer: Build this at your own risk! I will not take any responsability if you electrocute yourself, your manikin, your students or your cat!

I desingned this using the Revopoint Mini 3D-Scanner on the original plug and constructing the adapter in CAD around it. Thankfully, the original plug was white and not shiny, which are about the only circumstances this rotten scanner actually works as advertised…

Revopoint Mini with Philips-style plug on the turntable.

Med Sim Studio: Inspired by Vital Sign Simulator – but so much better!

Recently I got a comment from Adam Blumenberg (MD), concerning a new software called Med Sim Studio. He says he was inspired by the Vital Sign Simulator to program something similar. I would say “something much better”!

The Med Sim Studio runs on Windows and like the VSS uses a two-screen-setup, with one screen for the operator and one for the trainees. It contains most of the features you know from the VSS like heart rate, BP, rythm and so on. But unlike VSS, it is also a vast library of medical pictures, x-rays, labs, ecgs and even ultrasound videos!

To top everything you get pre-written cases like “anaphylaxis”, complete with pictures, critical actions and even a debriefing checklist!

And the best part: Everything is free to use and distribute!

I really am impressed – thank you Dr. Blumenberg! Keep up the good work!

Check out the website at https://www.medsimstudio.com/. The software is still under construction (July 2021) but you can already download and try a beta version. Go check it out!

SimTech: A/V Lifesavers and general Toolbox

Those of you who do in-situ simulations may know this problem: You are setting up the A/V-system, but suddenly you realise that a vital cable is missing. Or one of the facilitators needs to hook his phone to a PC to transfer an important file for the debriefing. Or the old projector that you’re using only has VGA input…

In short, there are many situations where you need just a simple cable or an adapter to solve one of these nasty connection problems. So it is a good idea to have a selection of spares and often used parts ready.

That’s why I put together a small bag with A/V-“life savers” for me. You will find the contents listed below. Maybe you can use it as an idea for your own practice or maybe you will even find something I have missed -> if so, please put your suggestions in the comments!

Contents:

  • HDMI cable male/male 3m
  • VGA cable male/male 3m
  • Adapter HDMI -> VGA
  • Adapter VGA -> HDMI
  • Adapter DP -> VGA
  • Adapter DP -> HDMI
  • Adapter DVI -> VGA
  • Adapter VGA female -> VGA female
  • Audio cable male/female 3.5mm Jack 10m
  • Adapter Jack 6.3mm -> 3.5mm
  • Adapter Jack 3.5mm -> 6.3mm
  • USB extension cables male/female 1m and 5m
  • USB B cable 20cm
  • USB Mini cable 1m
  • USB Micro cable 1m
  • USB Micro on-the-go adapter

Another thing I always take along is a small general toolkit. I use it for the installation of the A/V-system on the location and minor repairs on the spot.

DSC02125
A/V-Lifesavers

Contents:

  • Duct tape
  • Masking tape (for temporary installations on sensitive surfaces)
  • Skin tape
  • Cable ties (3 sizes)
  • String
  • Superglue
  • Thumbtacks
  • Nails
  • Caution tape
  • Cheap soldering iron
  • Electronic solder
  • Some wire (different sizes)
  • Electrical tape
  • Heat-shrink tubing (different sizes)
  • Lighter
  • Cheap multimeter
  • Battery tester
  • Marker
  • Basic tools (pliers, cutter, bit-set, adjustable spanner, hex keys)…
  • …and in addition I always carry my trusted Swiss-Tool X on my belt!

CT-scan your manikin!

In the age of the 3D-printer, you can print nearly everything. If you need a spare part, the printer will even copy things for you – if you have the right “blueprint”. And that’s where most of the work waits: In designing the 3D-model of the thing you want to copy. Sometimes you are lucky and someone has already done it for you. Sites like thingiverse.com are full of, well, things.

But sometimes all you have is the original. If the part has a simple geometry, cubic for example, it can still easily take some hours to draw it right with a CAD-program. If the geometry is unregular, rounded or not accessible for measurements, it’s nearly impossible to do it by hand. Of course there are quite a few 3D-scanners on the market, but most are really expensive, don’t really work, or both.

20170918_124831.jpg
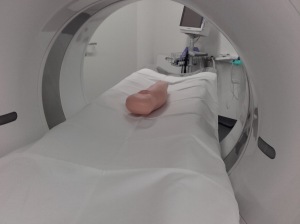
But many of you might have access to a 500’000 $ high-end 3D-scanner: The CT at your hospital! Just put whatever you want to print on the stretcher, fry the shit out of it, get the resulting DICOM-file, process it on embodi3d.com and ten minutes later you have a high-resolution, printable .stl-file! Other than a conventional optical 3D-scanner, a CT can even reproduce the internal structure of your stuff!

In my case, I wanted to copy the lower leg of a Laerdal Resusci Anne Simulator (I’ll tell you why in a later post, work in progress). I asked the friendly techs from my radiology department if they could scan the leg for me, and they agreed right away. They scanned the leg in extra thin slices, processed and burned the resulting DICOM-file on a DVD for me. As described in this excellent basic tutorial, I transformed the DICOM- to a NRRD-file an uploaded it to embodi3d. Ten minutes later I could download a perfect .stl-file – completely free! On embodi3d you also find more tutorials on how to get a good CT-scan of your objects. Of course, your rad-techs also know a lot about this!

The scanned Leg in the three planes.

So be nice to your radiology guys, fire up the CTs and scan your simulation equipment! The resulting files can be printed 1:1 as spare parts, but also be modified using a CAD-program. You could design a printable i.o.-leg, a bleeding arm or a fractured skull for your manikin – the possibilities are endless.

The .stl-file as seen on thingiverse.com

But please, if you do this: SHARE YOUR DESIGNS!!! Put the original files and any modifications you make online, so others can profit too!

You can find my .stl-file here.

VSS: Improved control-panel for the trainees

In the past, I used a modified keyboard to let the trainees control the Vital Sign Simulator (VSS) defibrillator function. I just put appropriate stickers on the function-related keys (e.g. a red flash-symbol and “SHOCK” on the “enter”-key), and covered the unused keys with a white sheet. A simple, but rather clumsy solution.

To make the controls more compact and easier to use (and give my lazy 3d-printer something to do…), I recently constructed this shiny new control-panel.DSC_7652_1024x678

It is made of the electronic innards of a normal USB-keyboard, some buttons, lots of colorful wires and a 3d-printed housing. See this new section for the detailed description.

Next step will be to take a wireless keyboard apart and build a similar control panel with it. Together with an android tablet and the SpaceDesk-App it will make VSS fully mobile!!!

The old control panel:ImageKey1


VSS 1.4.2: Automatic gradual change for HF

Good things take their time…

In the newest version of my Vital Sign Simulator, you can let the program change the heartrate to a target value over  a specific time (0-600 sec). Every 5 seconds the rate will change, every 10 seconds the documentation will be updated. Hope it all works well, the program is becoming more and more complicated with all the additions, sometimes this leads to unexpected complications under certain conditions. So please let me know if you experience problems!

Vital Sign Simulator 1.4.2! Free as always! Download available on sourceforge.net.

Gradual spO2-change for VSS

Vital Sign Simulator newest Version 1.4.0 out now:

Now more hasty clicking every few seconds if your patient is crashing, thanks to this new function: Automatic gradual increase/decrease of the spO2-value over a specific time (choose from 10-600 sec)! Every 2.5 sec the value will change, every 10 seconds an automatic log in the documentation will be made!

I will implement it for every parameter over the next week or so, but couldn’t wait to bring it to you. Have fun and check out version 1.4.0! Free as always! Download available on sourceforge.net.

Alternative to FFsplit for recording simulation sessions: OBS

Due to a prolonged downtime of the FFsplit download-page, I searched and found a good (or even better) alternative for recording simulation sessions: The Open Broadcaster Software.

I am testing it right now on an old pc with three webcams, and it looks good so far. Unlike FFsplit, it is still supported and development is going on.

I will keep you updated and maybe post a OBS-specific installation guide.

Vital Sign Simulator updated – again!

I promised you a further Vital Sign Simulator update soon. Soon is now!

VSS goes into version 1.2.0, one more function was added: The CPR-artefact!

Ever been annoyed by trainees interpreting the cristal-clear ECG during CPR without waiting for the break after 2 min? Well, fear no more! By clicking the yellow “CPR Start”-button, the current ECG-rhythm is replaced by a meaningless typical CPR-artefact. Press the button again when CPR stops, and the original ECG will reappear. See the manual for a detailed description.

So check out version 1.2.0! Free as always! Download available on sourceforge.net.