
For the debriefing of your simulation-scenarios, it might be useful to record it all on audio/video (A/V). Especially if you want to train “soft skills” like effective communication or Crisis Resource Management (CRM) in general, you should use some form of A/V. There are many commercial A/V-solutions on the market: From a simple video camera and a tv-screen (about 300$) to all-inclusive wireless multi-angle camera-systems with separate recording and debriefing sites (up to 100’000$).
If you don’t have the big money, but are not satisfied with just a video camera, here’s the solution for you: The LoCo-A/V system! For a total cost of about 1000-2000$ you will get a four angle “quad-split” video recording plus audio. You can even add your vital sign monitor to the quad-split. The system is built out of widely available hardware and free video capture software. In my experience it works very well without any glitches so far!
What you need:
Hardware:
- A fast computer, preferably a multi-core processor
- Up to four webcams (you should use different makes and models to avoid conflicts)
- USB-extension cables
- A microphone with extension cables (optional)
- A video capture card (optional, should be supported by FFsplit)
Software
- FFSplit for recording (free) or the Open Broadcster software (better and also free, see this post)
- VLC Media Player for playback (free)
- Vital Sign Simulator (optional)
Setup
Basic Setup
- For general help concerning FFSplit please consult the ffsplit forum
- Place the webcams around your manikin, so that the scene is covered from different angles
- Hang the microphone over the manikin (optional, you can also use one of the built-in webcam microphones)
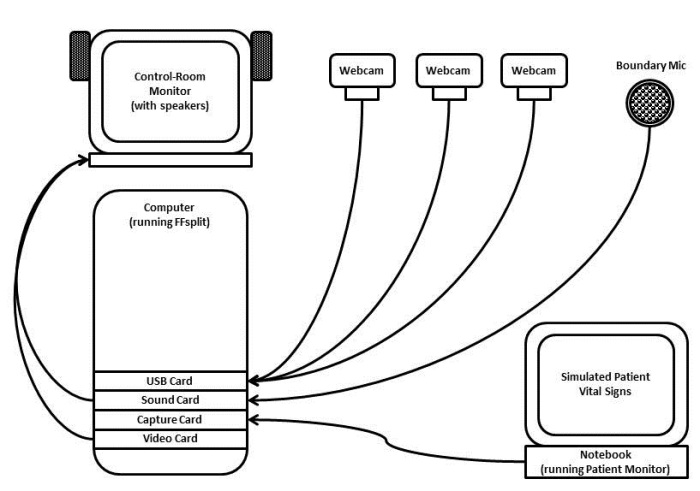
- Connect everything to your computer. To avoid bandwith issues be sure to spread the webcams over all available USB-controllers (eg. usually the mainboard USB-ports are separated from the other ones).
- Install drivers if needed
- Install and start FFSplit
- Set an appropriate video resolution in the encoder profile (for a classic “quad-split”: The total resolution of your webcams, eg. for four 640×480 cams choose 1280×960).
- Choose “local recording”
- Delete the preset layer (Desktop)
- Add a new layer (bottom line), choose “Video Capture Device” in the “Layer Type” dropdown menu
- Choose one of your webcams in the “Source” dropdown menu
- Adjust the webcam resolution according to your hardware (usually the highest resolution at which you still get 24fps or higher is OK)
- Repeat the above steps for all your webcams
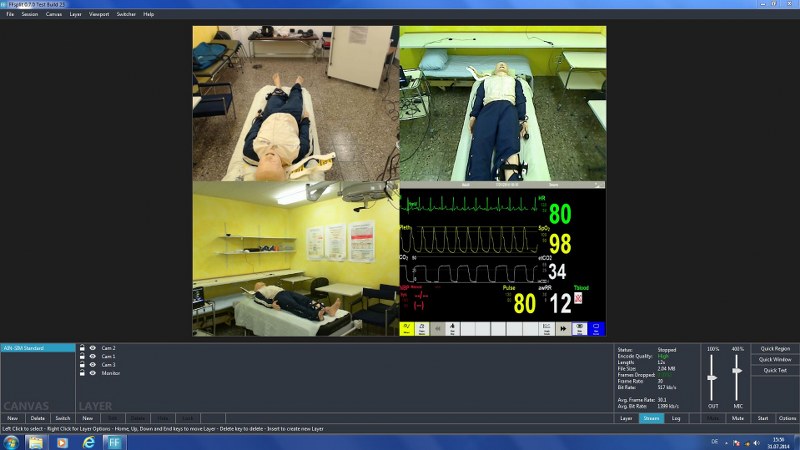
- Place the different layers on the canvas as you like, most common is a classic “quad-split” configuration
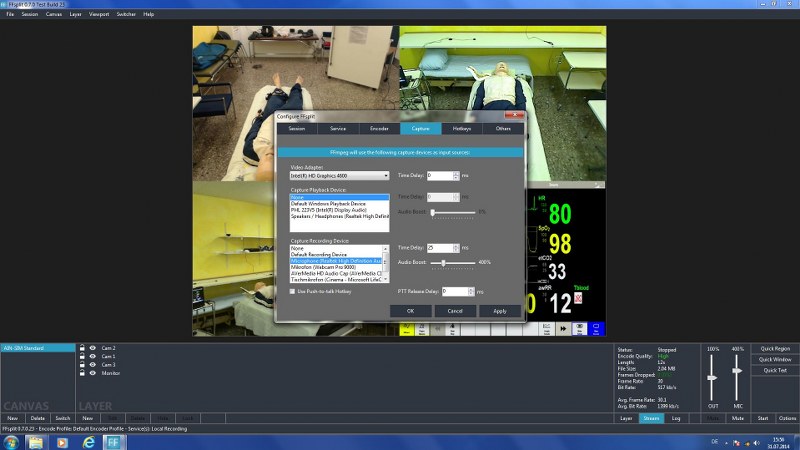
- Select your microphone under File -> Options -> Capture -> Recording Device (you can also select one of your webcam-mics there). Try the different mics until you find the best one. Any lag between the audio and video track can be corrected using the “Time delay” function.

Select the audio recording device in the options menu
Vital Sign Monitor Capture via capture card
During the debriefing it is sometimes useful to show the vital signs of your simulation manequin in paralell to the recorded video. If your vital sign monitor supports some sort of video OUT (eg. the VGA-port of the Laerdal Patient Monitor), you can add it to your split-screen. All you need is a supported capture-card in your computer and a matching cable.
- Install your capture card, install drivers if needed
- Connect the video OUT of your vital sign monitor to the video IN of the capture card
- Add a new layer, choose “Video Capture Device” in the “Layer Type” dropdown menu
- Choose your capture card in the “Source” dropdown menu
- Place the different layers on the canvas as you like, most common is a classic “quad-split” configuration
Vital Sign Monitor Capture using “Vital Sign Simulator” (VSS)
If you use the free software-based Vital Sign Simulator on the same computer also running your FFsplit session, you don’t need a capture card. That makes things easier and cheaper.
- For general help concerning VSS please consult the VSS Wiki or the VSS section on this site
-
Add a new layer, choose “screen” in the “Layer Type” dropdown menu, select “capture window” below and select the trainee-interface-window from the already running VSS
-
Place the different layers on the canvas as you like, most common is a classic “quad-split” configuration
Recording
- Hit “Start” when everything is ready, the record will save to the location chosen under File -> Options -> Others
- Hit “Stop” to stop the recording
Playback
- You can play the video on any player supporting the chosen video format. However, I suggest you use the VLC Media Player because of its ability to zoom in during playback. If you want to show a detail that is best visible on only one of your four splits, you can enlarge that part to full-screen.
- For general help concerning VLC Media Player please consult the web
- To zoom in on any part of your quad-split click Tools -> Effects and filters -> video effects ->Geometry -> Interactive zoom

Wow, i have been searching a long time for exactly THAT solution to do some nice but unexpansive Sim-Training! Tanks a lot!!!
LikeLike
Hi
With a friend of me from France we will create first neonatal simulator center in Algeria.
We will use laerdal simnewb simulator.
I want to know please, if your system can work with this simulator
And to send me a proforma ( price)
Thank you
Best regards
LikeLike
That’s great!
You can use the LoCo-A/V-System with almost any simulator. The only difficulty is to get the signal from the monitor with the vital signs (BP, HF etc) into your recording computer. The monitor with the vital signs must have some kind of output like a HDMI-out which you can connect to your capture-card.
I don’t know your exact system. The older Laerdal Patient Monitor Notebooks from Lenovo had a VGA and/or a HDMI-out, which works fine. The newer tablet-version from Laerdal should have a (mini-?) HDMI-out, too. But I haven’t tried these yet.
The price of the system is whatever you pay for your hardware (you have to get it and put it together yourself, DIY!). All the software is open-source and free of charge.
Kind regards et bonne chance!
LikeLike