
Do ACLS-Scenarios with just a cheap CPR-manikin and this free software! No costly high-fidelity-manikin or monitor/defibrillator needed!
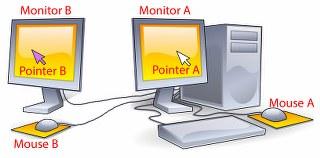
The vital sign simulator is intended for use in medical emergency training simulations. In combination with a (cheap) cpr-manikin, it offers a low-cost alternative to commercial high-tech patient simulation manikins. It is used with a pc and a dual monitor system: One monitor with controls for the operator and one providing the vital signs to the trainees. Heart rate, oxygen saturation, respiratory rate, blood pressure and various moving ecg-samples can be set and changed at any time by the operator. The trainee-side interface allows automatic/manual defibrillation, cardioversion and pacing.
Requirements
Hardware
- 1 PC or Notebook with dual-monitor-capability
- 1 additional Monitor, attached to PC or Notebook (one monitor for the operator, one for the trainees)
- 1 additional keyboard (recommended) or 1 additional mouse, attached to PC or Notebook (one keyboard/mouse for the operator, one for the trainees)
- 1 Set of stereo-pc-speakers with seperable speaker-boxes
Software
- MS Windows XP or later should work
- If you want to use a second mouse: A tool for two independent mousepointers, such as “Multiplayer” or “Pluralinput”
Setup
- Download the file “Vital Sign Simulator Installer.zip“
- Unzip to a folder on your HDD
- Run “setup.exe”
- Since the Programm was written with visual basic express, there are no installation options
- You might have to install Microsoft Visual Basic Power Packs 10.0 to make it work
Starting up with additional keyboard (recommended)
- Set up and connect your computer, monitor (A) and keyboard (A).
- Attach the additional monitor (B) and keyboard (B) to your computer and enable extended desktop (you should get an extension of your desktop on the additional monitor). Face it towards the trainees.
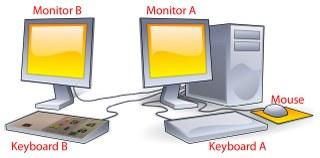
- Give the additional keyboard to the trainees.
- You might want to modify it a little: Place color stickers with text on the appropriate keys on the “trainee-keyboard” (eg. a red “SHOCK”-sticker goes on the enter-key, a yellow “LOAD” on the backspace-key and so on)
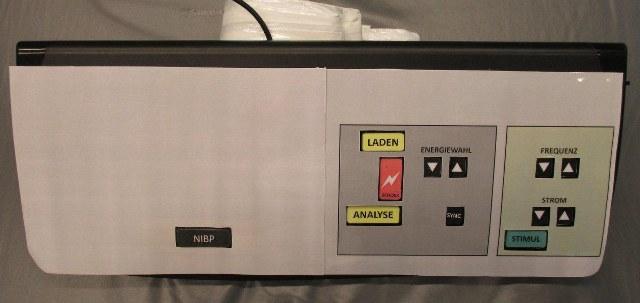
- Cover the unused keys using a overlay with holes in it where the used keys are. You can even ad descriptions on this overlay. Laminated printed paper works fine (see german example below).

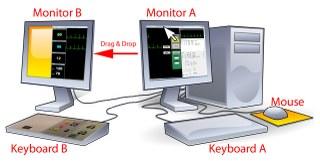
- Run Vital Sign Simulator, two windows will open (“Operator Interface” and “Training window”)
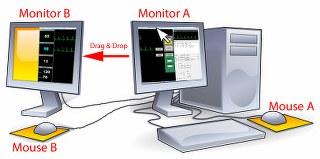
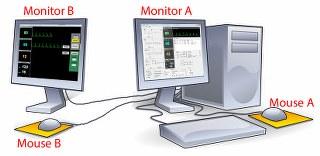
- Leave the operator interface on the original monitor (A) and shove the training window on the additional monitor (B), facing the trainees.
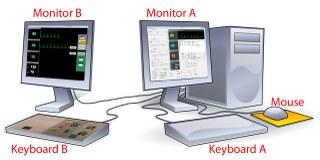
- Don’t forget: To use the trainee-keyboard commands, click “Keyboard trainees” under the “options”-section in the operator interface!
- You are now ready to beginn the simulation.
Starting up with additional mouse (complicated)
- Set up and connect your computer, monitor (A) and mouse (A).
- Attach the additional monitor (B) and mouse (B) to your computer and enable extended desktop (you should get an extension of your desktop on the additional monitor). Face it towards the trainees.
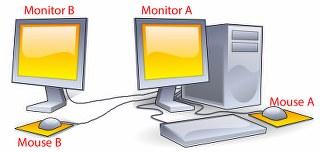
- Run the independent mouse-pointer tool of your choice (see “Software”). You should get two independent mouse-pointers.
- Give the additional mouse to the trainees.
- Run Vital Sign Simulator, two windows will open (“Operator Interface” and “Training window”)
- Leave the operator interface on the original monitor (A) and shove the training window on the additional monitor (B), facing the trainees.
- Ensure that the trainees have their mouse-pointer on their own screen. You are now ready to beginn the simulation
Operator Interface
The operator interface allows you to set and change the desired vital sign values. You can also play various sounds. A documentation section records pre-set values and events triggered by the operator.
Each vital sign has two sections: a command section where the operator can adjust the value and a monitoring section displaying the current values.
Heart rate (HR)
- Adjust the heart rate with the bar, hit “apply” to set it
- The current heart rate is displayed on the monitoring section to the right (“HR”)
- The trainees will see the heart rate only if the “HR available”-box in the monitoring section
is checked - If the currently selected ecg-rhythm is sinus, the ecg will change according to the new heart rate
- The program can change the current HR to a target value over a specific time. Just choose your desired target HR, replace the zero in the “over 0 s” part with your desired time an hit “apply”. The HR will change every 5 seconds, every 10 seconds the documentation will be updated.
- To stop such a running “change over time” function, just hit “apply” with a zero as desired time.
Pulsoxymetry (SpO2)
- Adjust the SpO2 with the bar, hit “apply” to set it
- The current SpO2 is displayed on the monitoring section to the right (“SpO2”)
- The trainees will see the SpO2 only if the “SpO2 available”-box in the monitoring section is checked
- The program can change the current SpO2 to a target value over a specific time. Just choose your desired target SpO2, replace the zero in the “over 0 s” part with your desired time an hit “apply”. The SpO2 will change every 2.5 seconds, every 10 seconds the documentation will be updated.
- To stop such a running “change over time” function, just hit “apply” with a zero as desired time.
Respiratory rate (RR)
- Adjust the respiratory rate with the bar, hit “apply” to set it
- The current respiratory rate is displayed on the monitoring section to the right (“RR”)
- The trainees will see the respiratory rate only if the “RR-available”-box in the monitoring section
is checked
Non-invasive blood pressure (NIBP)
- Adjust the systolic and diastolic NIBP using the up/down-boxes, hit apply to set it
- The current NIBP is displayed on the monitoring section to the right (“NIBP”)
- The trainees will see the NIBP only if the “NIBP-available”-box in the monitoring section is checked
- If the “Random +/- 2mmHg”-box is checked, the NIBP displayed to the trainees will randomly deviate up to +/- 2mmHg from the set value with every new measurement, to make it look more real
- The “measurement”-button starts a new measurement, similar to the “NIBP”-button on the trainee-interface
ECG-Rhythm
- Choose the desired rhythm by checking its radio-button, hit “apply” to set it
- The current rhythm is displayed as an ECG-strip on the monitoring section to the right. In contrast to the ECG-strip on the training-window, the operator-ECG is not moving
- The trainees will see the ECG only if the “ECG-available”-box in the monitoring section is checked
- If the “Auto-HR”-box is checked, the heart rate will adapt automatically to any chosen ECG-rhythm, eg. 35/min for ventricular bradycardia
- During CPR, hit the yellow “CPR Start”-button. While the button has an orange color, any ECG-rhythm will be replaced by a CPR-artefact, thus making a rhythm analysis impossible.
- Hit “CPR Stop” to change to the old rhythm.
- Note: Any rhythm changes made during CPR will only be effective once CPR stops! During CPR the AED will automatically respond “motion detected” to any “analyse”-request.
“Available”-box
- Each vital sign has an “available”-box in the monitoring section
- If the box is checked, the correspondent vital sign will be displayed in the training window
- Check the box as soon as the trainees have performed the correspondent action, eg. check the “NIBP available”-box when they have attached a (fake) NIBP-cuff, the “SpO2 available”-box for attaching a (fake) SpO2-sensor etc etc
Defibrillation
- Choose the desired rhythm, heart rate and NIBP to display after a succesfull defibrillation
- If the “Ignore defibrillation”-box is checked, the programm will ignore the defibrillation and leave the current values unchanged
Pacing
- Set the desired threshold for succesfull capture by using the up/down-box
- If the “Ignore”-box is checked, the programm will ignore pacing regardless of the applied mA
AED
- Hit “motion detected” if trainees move patient or continue CPR during analyse in AED-mode. The analyse will stop, a voice prompt will sound, then the analyse will start again
- Hit “analyse” to start analyse, eg. to simulate an AED which starts analyse by itself every 2 minutes
- Note: If the CPR-Button is active the AED will automatically respond “motion detected” to any “analyse”-request.
Documentation
- For every event, the timestamp with all vital signs will be recorded on a single line, plus a short description of the event
- To start the documentation timer, hit the “Start”-Button
- Every change in the vital sign values will be recorded automatically
- Every action by the trainees (eg. defibrillation) will be recorded automatically
- To record an standard event manually, hit the desired button
- To record medications, hit the button “Medication” after choosing from the drop-down-list next to it
- To record a custom event, hit the button “Custom I” or “Custom II” after writing a short description in the text field next to it (you must turn the “keyboard trainees”-option off to write!)
- Save the complete documentation to an .rtf-file under “Filing”, “save documentation”
- WARNING: Changing the language will delete all current recordings
Sounds
- Monitor-related sounds (eg. alarm) will play on the right stereo-channel, patient-related sounds (eg. groaning) will play on the left stereo-channel
- Thus put the R-speaker next to the “trainee-monitor”, while the L-speaker goes under/into/next to the “patient”
- Play the desired sound by clicking the corresponding button
- If the “system-sounds”-checkbox is checked, monitor-related sounds will play automatically (eg. a pumping sound when measuring the NIBP)
Training Window
On the training window, the vital signs are displayed to the trainees. The trainees can perform defibrillation, pacing etc. using the trainee-interface. The layout of the training window is similar to commercial monitoring/defibrillation units.
The trainees control their interface using either a keyboard (recommended method, see “Keyboard layout”) or a second mouse.
Keyboard layout
- To use the keyboard commands, click “Keyboard trainees” under the “options”-section in the operator interface
- The keys are grouped according to their function.
- You should label them with a sticker or some kind of overlay to make it easier for your trainees, like this (german) example:
- Energy up: END
- Energy down: DELETE
- Load: BACKSPACE
- Shock: ENTER
- Analyse: SHIFT R
- Sync: UP
- NIBP start: SPACE
- Pacer on: ZERO (Numpad)
- Rate up: 9 (Numpad)
- Rate down: 8 (Numpad)
- Current up: 3 (Numpad)
- Current down: 2 (Numpad)
Heart rate (HR)
- The heart rate is displayed in beats per minute in the top left corner
Pulsoxymetry (SpO2)
- A SpO2-value is displayed under the HR on the left
Respiratory rate
- The respiratory rate is displayed in breaths per minute under the SpO2 on the left
Non-invasive blood pressure (NIBP)
- The systolic and diastlic NIBP in mmHg are displayed in the bottom left corner
- To get a value, the trainees have to take a measurement first by pressing the “NIBP”-button on the right
- Just like in real life, measurements will take time and may differ slightly from a previous measurement if the respective option on the operator-interface is enabled
ECG
- The moving ECG-strip is displayed in the top middle of the training window
- The first line represents the current beat-to-beat ECG, about six seconds
- The second line is the “history” ECG, it gets updated every time the first line gets full
Defibrillation
- The defibrillation section is on the right, with a grey background
- Choose the dedired defibrillation energy in J by using the up/down-box
- Hit the “LOAD”-button to load the defibrillator to the set energy
- Like in real life, loading will take time. Wait till the appearing loading bar is full, the “SHOCK”-button will turn red when ready
- To deliver the stored energy, hit the now red “SHOCK”-button, it will turn grey again after delivery
- The shock will be visible on the ECG-strip, and a message with the applied energy will appear for a short while
Sync
- To deliver a synchronized shock, hit the “SYNC”-button, it turns yellow when active
- QRS-markers will appear on the ECG-strip if the current rhythm allows it
- Click and hold the “SHOCK”-button till the shock is delivered on the next marker
- The “SYNC”-button will disable and turn grey again after shock
Pacer
- To enable the pacemaker, hit the “PACER”-button, it turns yellow when active
- Set the target heart rate by using the “RATE”-up/down-box
- Increase the current to the desired strenght using the “CURRENT”-up/down-box
- Pacer-peaks will appear on the ECG-strip according to the set target rate
- Capture will occur according to the chosen values on the operator-interface
AED
- Hit “analyse” to start analyse, eg. to simulate an AED which starts analyse by itself every 2 minutes
- AED will give audio and written prompts
- Note: If the CPR-artefact is active, the AED will automatically respond “motion detected” to any “analyse”-request.

[…] Vital Sign Simulator […]
LikeLike
[…] Vital Sign Simulator […]
LikeLike
What about using MIDI? There are many MIDI-Controllers available, so you can control the VSS with (motorized) faders, Buttons etc.
LikeLike
I wanted the program to be as simple as possible on the hardware side. Hence I went with the keyboard-based solution.
I don’t have much experience with MIDI (apart from the basic concept). I think you could even use some kind of Arduino. Of course a real knob to turn would be nice for e.g. the pacer, but then people would have to buy a controller, buttons and knobs and rig it all together… Not everyone can do that! Besides, I don’t have the time to adapt the controls on the software-side.
But thank you for your Input!
LikeLike
thank you for this amazing app!
is there anyway to configure it to include a capnogram (preferrably with variations like oesophageal intubation, tube obstruction, reduced cardiac output, CPA…) and a pleth waveform (with a waveform amplitude to match ecg, low cardiac output scenarios…)?
but really, thank you!
LikeLike
In theory yes, that would be possible. But sadly I don’t have the time… I have pretty much abandoned this baby.
If you want to draw some graphs and write some code, give it a try and go ahead! (I am no pro programmer myself, so it is possible 🙂 )
LikeLike
Hello! This is amazing! Quick question, could I use an android tablet as a second monitor? I’d love to have students able to touch the monitor to get info.
LikeLike
Hello! This software is amazing, could I use a cheap android tablet as a second screen? I’d love it for students to be able to touch the monitor. Thanks for your help!
LikeLike
Hi Kurtis,
THX! Yes, you can. There is an free app called spacedesk. You have to install it on both the (windows) computer running VSS and your tablet. The tablet is then connected via WiFi and acts as a additional screen. But the mouse-input on the tablet doesn’t work very well, you might have to use a wireless keyboard instead. Read my post on creating a dedicated interface, it might give you some ideas. Let us know if it works!
Kind regards from switzerland!
LikeLike
Can You make the ECG come with sound for every pulse like, beep beep beep
LikeLike
Hi there!
A beep (beep beep beep beeeeeeeeeeeeeeeeeeeeeep 😉 )is not possible at the moment (the program can play only one sound at a time, so it would break the other sounds / vice versa…).
Sorry about that.
LikeLike
Hi.
I’m looking for a simulation monitor, which I only need once in a while, so I can simulate and train emergency vitals. I came across this software and read something about “free”, so I ask does this mean I am free to use it in any situations or that the app is free of costs? Thank you for your help. Mr. Fisher, greetings from Austria.
LikeLike
Dear Mr. Fisher
You are free to use my program according to the GNU General Public License version 3.0 (GPLv3).
In short, this means you are free to run, study, and modify the software. Even sharing of the software is allowed, provided you do so under the same licencse terms.
I do not want to make any profit, but rather provide an alternative to the costly commercial solutions!
Greetings from Switzerland!
LikeLike
I suggest including other animated graphs, ie pulseoxymetri and capnography – that would make it more realistic.
LikeLike